THE DAINTY SQUID
  • blog
    • all the posts!
    • stroup mansion
    • some of my favorite posts
    • plants + gardening
    • beauty, fashion + hair
    • reviews
    • window shopping
    • explore everywhere
  • about me
  • contact
  • shop
Category:

some of my favorite posts

that time I reunited antique photos with their family…

by Kaylah Stroup November 7, 2018

I got my collecting gene from my dad. We both love junk. He doesn’t necessarily collect things like I do but he certainly loves to buy them. His Saturday mornings are spent auctioning and he’s a huge fan of a dollar box.

If you aren’t familiar with auctions, larger items and things that are worth something get auctioned off individually but there are tons of items that it’s just not worth anyone’s time to do that with. Those get thrown in a box. Before an auction starts you have the opportunity to go around and finger through things and see if a box might contain something you’re interested in. Sometimes boxes go for a lot, when someone spots something inside they have their heart set on, but quite often they sell for next to nothing. Dollar boxes are fairly common at the auctions he attends, and sometimes the auctioneer will even offer a lot of boxes for a single dollar simply because no one is bidding. My dad loves that. Many times he’ll come home with just boxes and boxes of random things because he couldn’t resist. He then distributes the finds among my brothers, their children and I. Of course, there is lots of actual junk but he’s definitely found more than a few really great things.

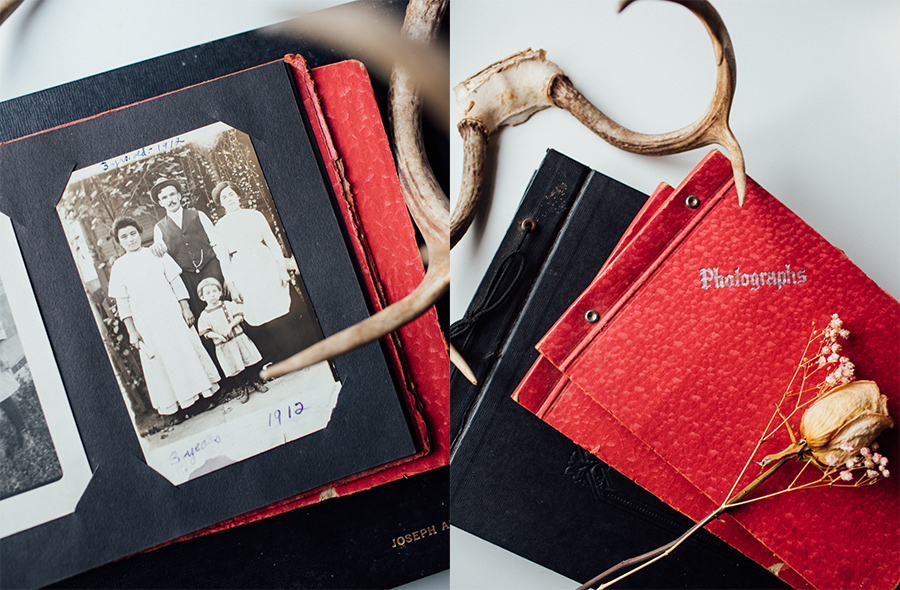
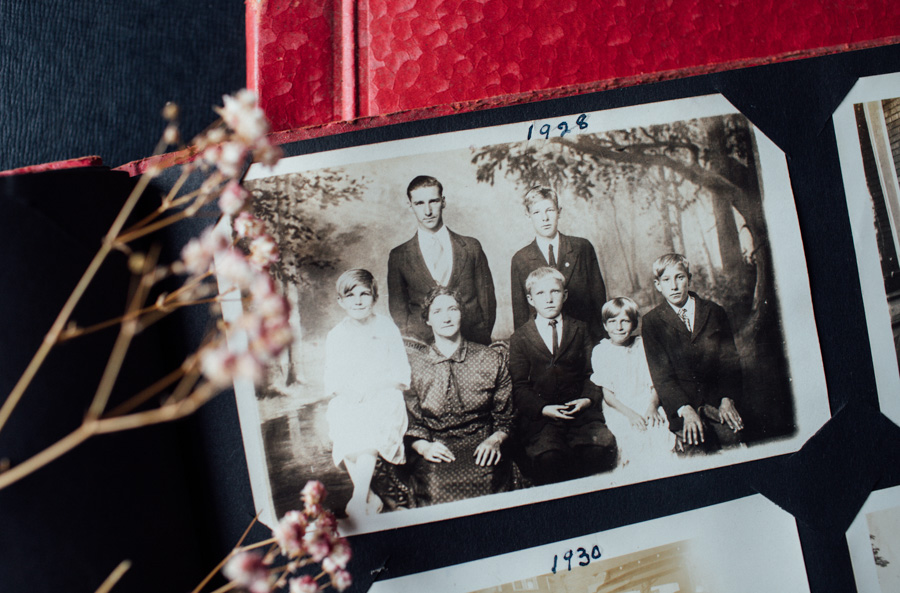
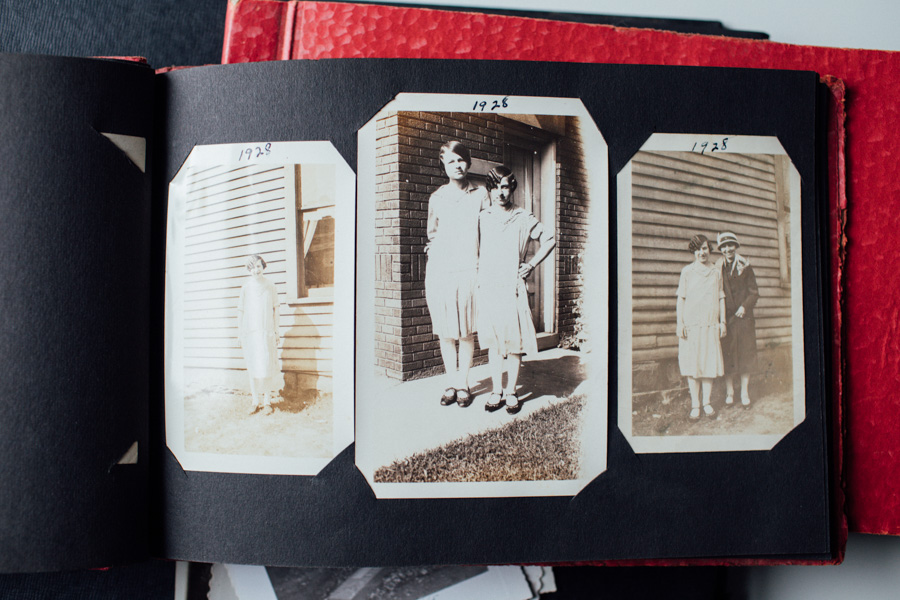
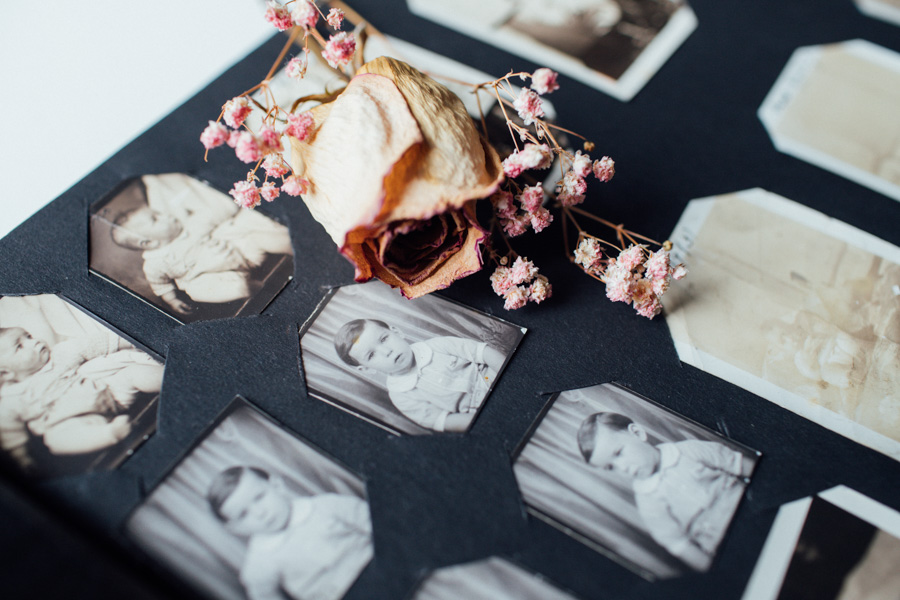
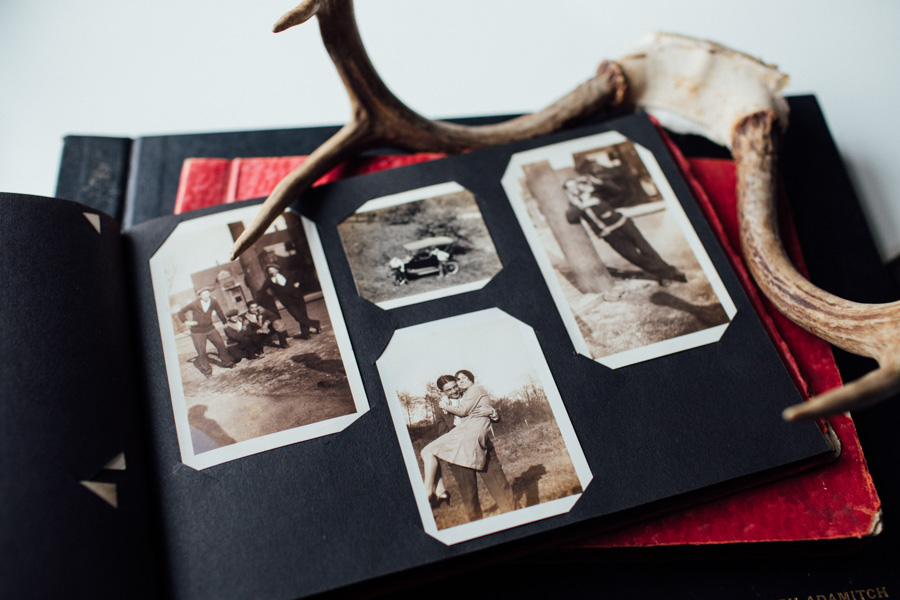
Over the summer, one of his dollar box finds was three photo albums chock-full of old photos dating all the way back to 1912 which he gave to me knowing I LOVE old photos. I pored over those albums. The photos were incredible. I had no idea what I’d do with the massive album and it’s two smaller buddies but I certainly couldn’t let them just get tossed.

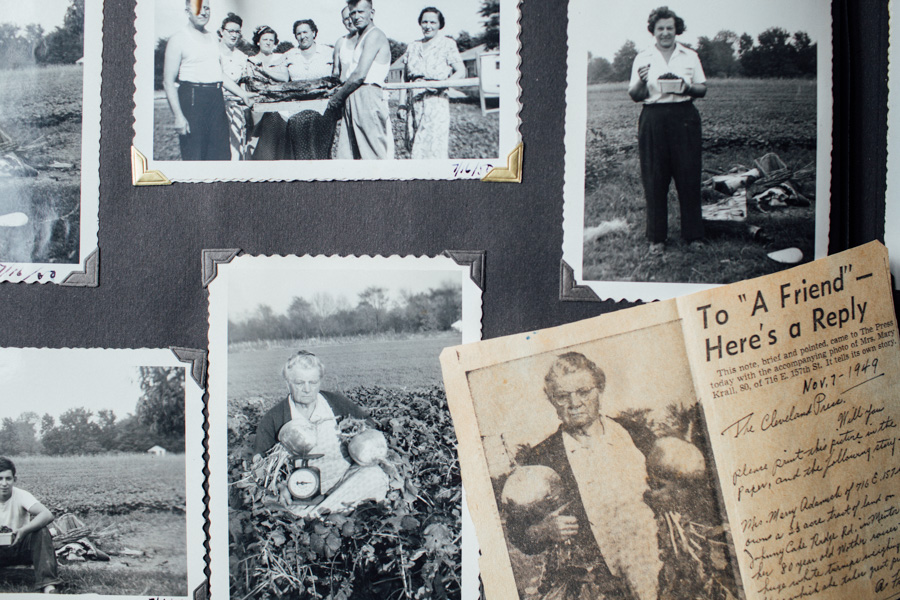
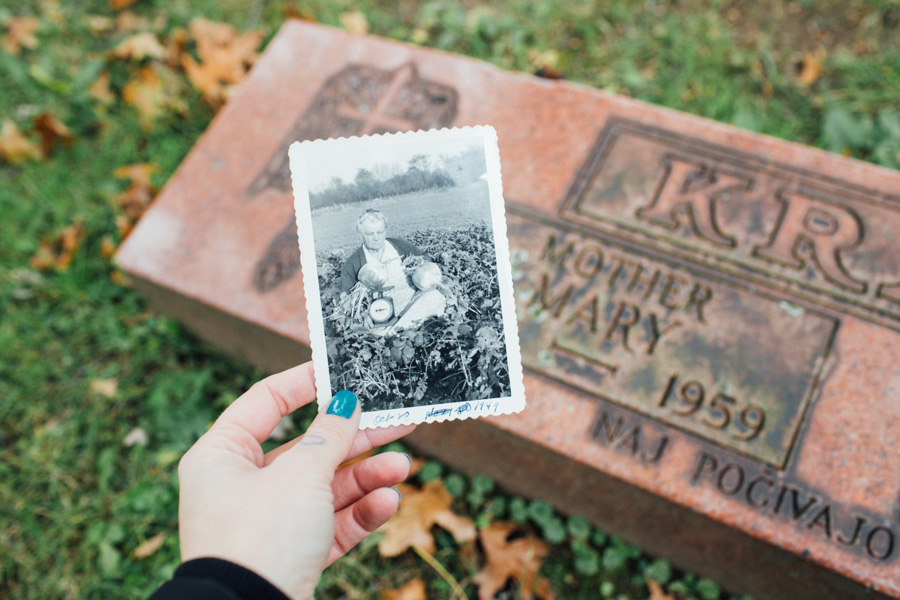
Fast forward to last week, I was cleaning my office and stumbled upon the albums again. I remembered that there were some Christmas photos which made me think maybe I could find an old Halloween photo as well and that it’d make a cool Instagram post. While flipping through the pages of the largest album, I spotted a newspaper clipping. Mrs. Mary Krall had written in to The Cleveland Press about her giant turnips requesting that they share a photo since she took such ‘great pride’ in them. Out of curiosity and not really expecting to find anything, I decided to look up the name and address listed. I found a listing on FindAGrave that revealed she was buried in a cemetery near my home!

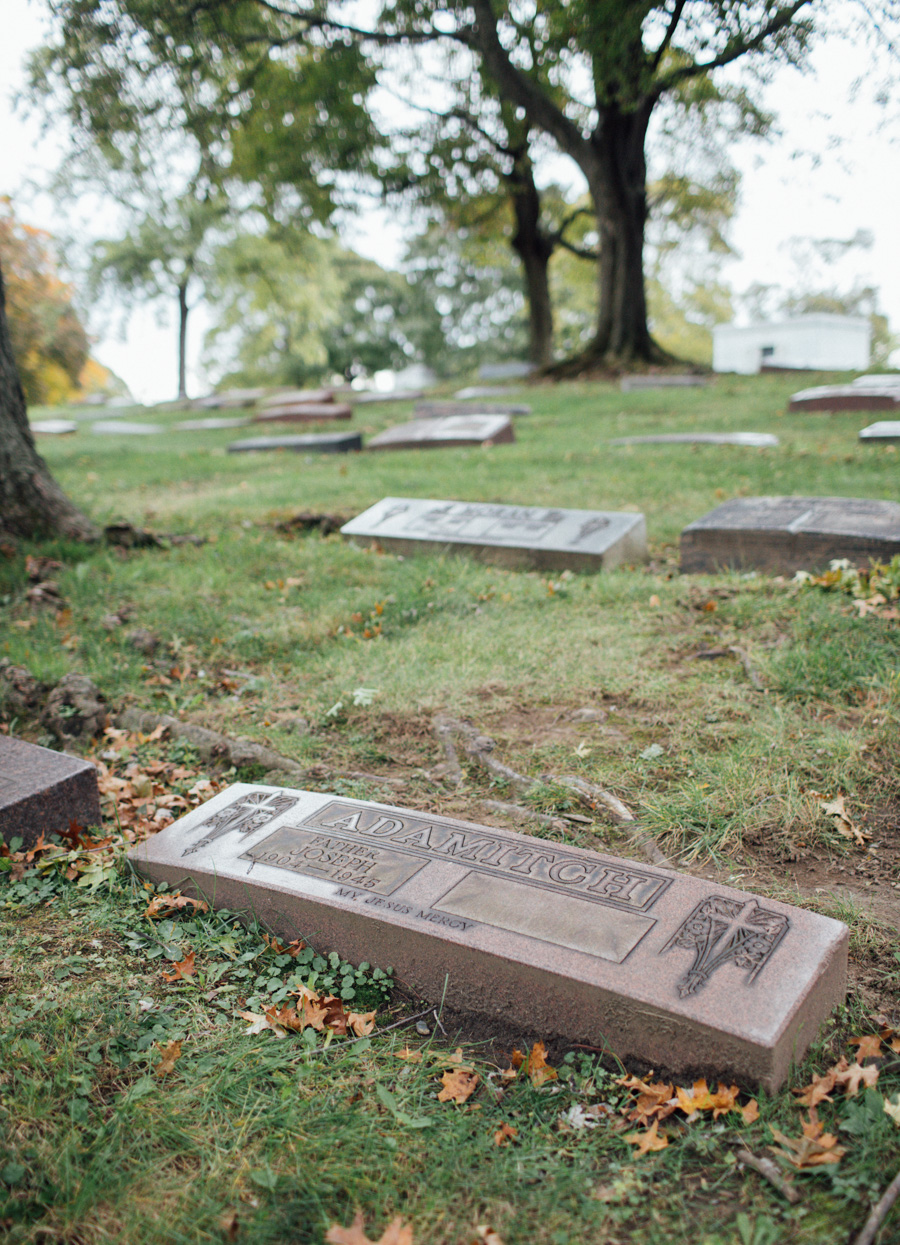
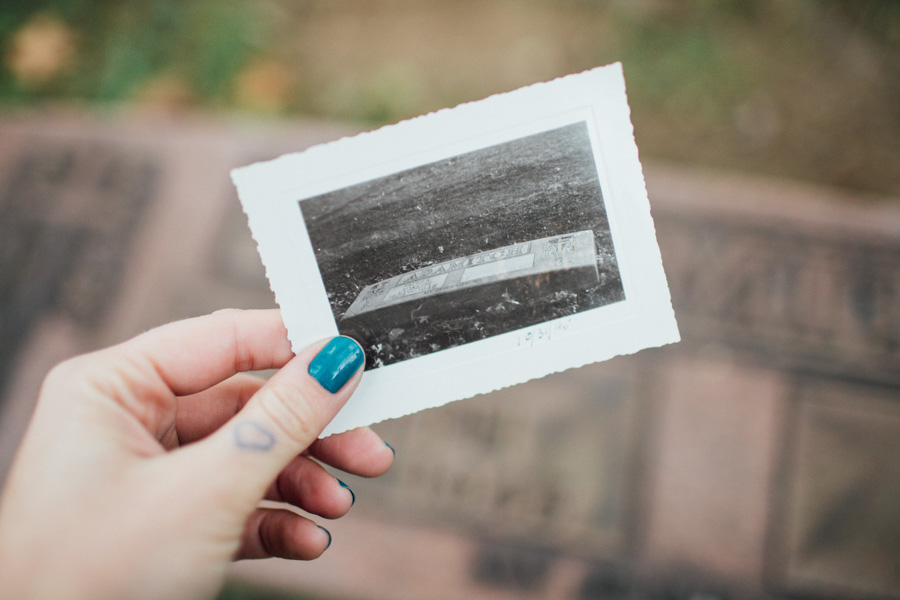
I flipped through the album a few more times, searching for faces I could tie to names and names I could hopefully tie to headstones I would search for. In my hunt, I even found photos of a family headstone that were taken back on Halloween of 1948.

Armed with names and a hand-drawn map I made from the terribly hard to read ones available online I headed for the cemetery! Luckily, the map I drew had some key elements that made hunting down the headstones fairly easy. Less than two hours after looking up the name online I was standing at her grave.

Being able to hunt down the graves of those in the album was a thrill! I have so many interesting old photos that I’d love to figure out more about. It’s just really neat to be able to tie names to photos to headstones. More exciting than that though?

I’VE REUNITED THE ALBUM WITH IT’S FAMILY!

As I write this post, the three albums are in the mail heading to one of the men in the photograph’s great-niece. When I was looking up some of the names I found in the albums on different sites, I happened to notice a comment on FindAGrave that sparked my interest. Someone had left a comment indicating they thought this person might be their great uncle. I couldn’t click on the name fast enough! Her profile made me even more excited as it was clear she was super interested in family history. She had surnames listed on her page that matched up with the album. I had chills.

I reached out, showed her the photos and offered to send the albums her way. She seemed very excited and shared some family history with me. I can’t even imagine how I’d feel if the tables were turned. I’ve literally had dreams about finding old albums of my family in random places.

It’s so funny that one little comment she left, probably not thinking much of it, was able to connect us. I guess that goes to show if you’re interested in your family tree and doing research online, always leave a trail of breadcrumbs so people can find you!

Another fun tidbit from this saga – The large black album? The woman I reached out to said a matching one was found in her mother’s things when she passed away. So interesting, right?!

I’m still just over the moon about this whole thing. Every step of it has been exciting – getting the album, finding names, researching their history, searching out the headstones, and of course, tracking down a living relative to give the album back to. It’s always been a mystery to me how old albums like this get tossed in the trash or put up for auction. I couldn’t imagine how no one in a family would be interested in keeping them but now I’ve realized that just because they end up in these places doesn’t mean everyone in the family knows they’re there. My dad doesn’t recall which auction he got these from or what else was there. I’m so curious if there were more old albums stashed in other boxes or if there were other important family heirlooms floating around that auction. I’m just so happy to be able to play a part in getting a little piece of family history back where it belongs.

Gosh, now all I want to do is find old things at auctions and track down family who might still want it!
xoxo

0 FacebookTwitterPinterestTumblrRedditEmail

globe collection 2018

by Kaylah Stroup November 5, 2018

The Dainty Squid globe collection

Something you may have noticed from my photos, particularly the ones on Instagram, is that I collect globes. You may also know that if you’ve been reading for a while because a few years back I actually shared a post about my globe collection. (Check that out here.) Since that post, I’ve gained a few new additions to my collection, and I’ve moved into a new apartment.

I stumbled upon that old post a little while back and had the idea to do an updated version. I think it’s really interesting how different a collection can look based on how it’s displayed. This apartment? It came with the PERFECT way to display my globes. Unlike my old apartment, where they were scattered about in different rooms, the majority of my collection is in one spot now. The top of my kitchen cabinets and fridge display all but four of my globes.

globes vintage globes, globes

Of the remaining four not in the kitchen, three are grouped together in my living room and the last is in my bedroom. Honestly, if the one in my bedroom, a pedestal globe, would fit in the kitchen that’s definitely where it’d be. Alas, there’s no room on top of the fridge for it!

The three in my living room are all moon globes. Going through my collection it’s easy to say “that’s my favorite!” I love them all. I have at least eight ‘favorites’ but the moons ones count as three of those. They’re just really unique pieces. Generally, they’re much more expensive and harder to find than globes of the Earth. I feel pretty lucky to have gotten my paws on these. Two found at an estate auction and gifted to me by my parents, and the third a gift from my husband!

My globes have all been collected from estate sales, garage sales, and auctions. A few have been received as a gift as well, as I mentioned above. I’m very thrifty when it comes to my collections, and this one is no exception. The price of globes seems to have really increased since I started collecting but honestly, that’s probably a good thing. I’ve definitely slowed down these days, making purchases with a lot more thought instead of just buying any globe I see. These days I prefer them made of metal, and less than the standard size of 12 inches. (Mostly because smaller means I can have more of them but goodness knows, if presented with another large one I wouldn’t turn it down!) I’m still hoping to find the unicorn of globes, the Mars globe, for dirt cheap! I definitely wouldn’t mind a few more moon globes either.

I’ve been collecting globes for probably around seven years now. Just like anything else, there is an ebb and flow to my obsession. Sometimes I’m actively hunting every chance I get, but most of the time I just let them come to me. I was pretty happy with my collection until I started working on this post. After taking photos, I started browsing the internet and trying to convince myself there was definitely room for another few above my cabinets. They just look so darn pretty grouped together!

Holding my largest, smallest and of one of my favorite metal ones!


Some vintage globes I’ve got my eye on…

0 FacebookTwitterPinterestTumblrRedditEmail

nail art idea – the scotch tape method

by Kaylah Stroup November 1, 2018

easy triangle nail tutorial, nail tutorial

These last few weeks I’ve been experimenting with using scotch tape as a way to decorate my nails again. I first started doing this five or so years ago and even wrote a post with some tips. Playing around with this method again has me feeling all inspired! I thought it might be fun to update that old post with new tips and share a few photos of recent designs.

Sounds totally tacky to be doing your nails with scotch tape but the results are way cool and it’s super easy. Even better than that, it’s quick! In under twenty minutes you’ll have a manicure that looks like it took hours + a way steadier hand than anyone really has. As big of a fan as I am of taping off sections and stenciling in shapes, this is much easier.

How to…
Paint nail polish of your choosing on to scotch tape that is still attached to the roll. Once it’s thoroughly dry, cut the tape into whatever shape your heart desires, and apply to your nail. Seal it in with a top coat, and you’re all set!

SIMPLE. AS. THAT.

A few tips to get you started…
▴ Paint the tape before you paint your nails this way the tape has a chance to dry a little bit longer. If it’s still tacky when you try to cut it, you’re gonna make a mess.

▴ Make sure your nails are completely dry before applying the tape, or before cutting the tape for that matter. You wouldn’t want to smudge them.

▴ As long as everything is dry before you get started, the tape is easily removable if you decide halfway through your manicure you’re not in love with the direction you were heading. You can even reuse the pieces on a different nail. Be careful removing them though because the polish can flake off the tape.

▴ After you’ve decided on placement, be sure to press the tape down thoroughly. Air bubbles and corners not pressed down are basically a guarantee your manicure won’t last!

▴ Your top coat is the most important part of this process. If you don’t use one, the tape will almost immediately come off. My all-time favorite top coat has always been Seche Vite. It dries quickly and I have yet to have any issues with the tape peeling up from underneath it. Don’t be afraid to do a second coat if the corners of your tape pieces are sticking up a bit.

▴ Sometimes the small pieces of tape are really hard to place using just your fingers, try tweezers!

▴ Scissors without a straight edge, like these ones that cut different patterns, open you up to unlimited design options.

nail art inspiration nail inspiration

When you’re ready to remove it, the tape easily comes off with nail polish remover just like your polish.

If you have any questions, let me know! I’d love to see your nail creations if you decide to experiment with tape. Tag me on Instagram, @thedaintysquid.
xoxo

More nail art related posts – a few of my favorite nail tools, nail sticker how-to and lastly, #kaylahsfancynails – where you can find even more nail inspo!
0 FacebookTwitterPinterestTumblrRedditEmail

National Cat Day 2018

by Kaylah Stroup October 29, 2018

If you’ve been on social media today at all, I’m sure you’ve seen that it’s National Cat Day! I can’t think of a more appropriate way to celebrate than to share a few of my favorite recent photos of Professor. This little rascal brings a smile to my face approximately forty thousand times a day. He has such a huge personality jampacked inside that tiny frame. I hope he can brighten your day a little bit as well.

Two things before I end this post –
▴ Professor has his own instagram account which you should absolutely follow!
▴ National Cat Day was started in 2005 as a way to bring awareness to the number of homeless cats. Lots of shelters offer discounts or specials today in celebration, might be a good day to finally adopt that fuzzy friend you’ve been thinking about!

Professor’s bow tie is by Carvas. Can’t recommend them highly enough! He wears his every single day, it’s not just for photos. Since discovering how dang cute he looks in them, I don’t think he’ll ever not wear one again. 

0 FacebookTwitterPinterestTumblrRedditEmail

tips for keeping your hair healthy, shiny & strong

by Kaylah Stroup October 24, 2018

Over the last eight or so years I’ve written many posts about hair. Most of which concentrate on dyeing your hair and maintaining that color. I’ve got a list of must-read hair posts down at the bottom of this one! Now that my hair is finally past shoulder length I feel like I putting more effort into keeping it healthy is essential. Here are a few of my favorite tips for keeping my locks shiny and strong…

▴ Wash your hair less. This is really hard for some folks, I totally get it. I used to wash my hair every single day. I love freshly washed hair but shampoos strip your hair of important natural oils. It took a while but I finally found a dry shampoo I loved and figured out how to use it correctly. I am now a member of the every other day hair washing club and my hair has never looked better. My color is lasting SO much longer.

▴ When you do wash your hair, use shampoo only from root to mid shaft. No sense in stripping your ends from the oils they so desperately need, especially since they’re the most prone to drying out.

▴ Use a special hair towel. A towel made specifically for your hair is a game changer. Not only will it get more water out helping your hair dry quicker, but it’ll also be much more gentle on your locks!

tips for keeping hair healthy and strong Kaylah Stroup hair

▴ Hair masks! Every few weeks I mix a bit of dye with my favorite hair mask and let it sit for a half hour or so. It’s a nice touch up of color with all the benefits your mask of choice adds. My reigning favorite is the Eva NYC therapy sessions hair mask. It smells wonderful and leaves my hair moisturized, shiny and looking downright beautiful!

Even if you’re not adding dye, masks are great for helping your hair look it’s best. Nothing will save super damaged hair but a good mask certainly make your locks look better.

▴ Heat protectant is essential if you’re using styling tools. The key here is to make sure you’re applying it to all of your hair, not just the top layer. I’m currently using CHI Iron Guard Thermal Protection Spray. Not only does it protect my hair from heat, but it also helps seems to help my curls hold better.

▴ Speaking of hair products, Hask Placenta is amazing. I could write a whole post about how much of a wonder product this stuff is. It’s the only thing I’ve been consistently using since I started dyeing my hair. My number one must-have hair product! I spritz it on my damp hair before brushing. I let it sit a few minutes then comb through. It makes my hair so much more manageable. Hask Placenta isn’t sold as a ‘detangler’ but it’s certainly proven to be for my hair. I seem to always forget it when we go on vacations and I can definitely tell a difference on days I don’t use it.

▴ Satin Pillowcase! Gentle on your hair, cooler to the touch than a regular pillowcase and good for bedhead. Switching to a satin pillowcase meant no longer waking up with bangs sticking straight out in the morning.

tips for healthier hair

What are some of your most trusted hair tips?
xoxo

More hair related reads;

▴ My five must-have hair products ▴ 7 tips for maintaining bright hair color ▴ Two tips for switching hair colors easily ▴ Bleaching your hair 101 ▴ How to clean up hair dye messes ▴ Nine truths about having dyed hair

YOU CAN FIND MORE HAIR DYE TIPS AND GUIDES IN MY HAIR MASTER POST.
0 FacebookTwitterPinterestTumblrRedditEmail

three favorite Cleveland cemeteries

by Kaylah Stroup October 16, 2018

The Haserot Angel, Lake View Cemetery, Cleveland cemetery

I really love Cleveland. I think we’re a totally underrated city, and I want to do my best to help spread the word that this should be a place you visit at least once. Last month I shared some of my favorite spots in Cleveland, and before that, I spilled the beans on my favorite beachcombing spots in the city. Now, I’m back to talk about my favorite cemeteries.

One of the very first things I do after choosing a location to take a trip to is search for their best cemeteries. I wanna check out all the coolest headstones, and wander the oldest graveyards. Trouble is, without putting in a ton of research, it’s not that easy. Unless a city has a wildly popular memorial or is known for their cemeteries (hey there, Salem!) most people don’t necessarily go around posting lots of photos or information.

Buuut this is The Dainty Squid, and it’s October so here we go!

▴ Lake View Cemetery

12316 Euclid Ave, Cleveland, OH

Cleveland’s most popular cemetery! The kind of place that even if visiting cemeteries in each city you visit isn’t something you regularly do, you might come here. 285 beautiful acres, many famous interments including a former president, tons of beautiful headstones, and even a few geocaches. It’s a wonderful place to spend an afternoon – although it would take you a whole heck of a lot longer if you wanted to see everything. Every single time I go I find something new!

Must see memorial – The Haserot Angel, of course! A bronze sculpture of the ‘Angel of Death Victorious’ who appears to be weeping black tears. Lake View is pretty large and he’s easy to miss but the good news is you can simply use your GPS. The ‘maps’ app has The Haserot Angel listed as a landmark. Using the directions will only get you to the cemetery, not the memorial. Once inside you can use the location pinned as The Haserot Angel and yours to work your way closer.

Another favorite of mine is the weeping woman a few photos below. She’s life-sized and honestly, one of the most haunting statues I have ever seen. I am not superstitious nor do I think cemeteries are creepy but I’ll tell you what, I don’t like turning my back on her. My photo doesn’t do her extremely detailed and realistic face justice.

lake view cemetery, best cleveland cemeteries favorite cleveland cemeteries

▴ Monroe Street Cemetery

3200 Monroe Ave Cleveland, Ohio

Monroe Street Cemetery is a historic cemetery on the West side of Cleveland, until the late 1890’s it was actually the only public cemetery on the West side. It is said that burials began in 1818 but the earliest headstone that can be found is 1827. There are currently over 31k people buried on the 13.63 acres, over 500 of which were soldiers. During the civil war, soldiers who died at Army camps near Cleveland were often buried here. There are also two mayors, as well as many notable folks who helped build Cleveland and Ohio City buried here. My favorite fun fact about the cemetery though? It was fenced during the 19th century to keep out wandering hogs.

Must see memorial – This isn’t one specific memorial but since the moment I spotted them I’ve been enamored with the headstones that line the fence closest to the junkyard. When you enter the cemetery they’ll be to your far right approximately half way down the fence. They’re old and often, the greenery around them keeps them mostly hidden. The rest of the cemetery feels so open and inviting but this line of headstones feels so tucked away and secretive.

Monroe St. Cemetery, fall cemetery

▴ Riverside Cemetery

3607 Pearl Rd, Cleveland, OH

Riverside Cemetery is 102.5 hilly, green, tree-covered acres. Riverside was the first major-sized, non-sectarian, garden-type Cemetery established west of the Cuyahoga River. The cemetery is just over 140 years old and offers a wide variety of memorials. Just like Lake View, on each visit I find something new and interesting.

Must see memorial – One of my favorite headstones in Riverside is Thomas Baran’s. It’s an interesting collage of seemingly random items. Easily one of the most unique headstones I have ever seen! Multiple portraits of Jesus, book covers, telescopes, planets, and so much more can be found on the headstone. I have a few more photos of it located in this post. If you’re entering the cemetery off of Pearl Road, stay to your left and about 3/4 of the way to the back of the cemetery, it’ll be on your right side.

best Cleveland cemeteries Riverside Cemetery, Cleveland cemeteries, best cleveland cemeteries

Two notable mentions –

▴ Erie Street Cemetery is the city’s oldest existing cemetery. It’s fairly small but definitely worth a peek if you’re out wandering around the city. Although they aren’t all marked, there are nearly 18,000 interments!

▴ Not in Cleveland but worth a stop if you’re traveling through or up for an afternoon drive, Willoughby Village Cemetery is home to ‘the girl in blue’. One of my absolute favorite headstones. Read more about her here.

I’d love to hear about your favorite cemeteries in your city!
xoxo

1 FacebookTwitterPinterestTumblrRedditEmail

Hug Point

by Kaylah Stroup October 15, 2018

Throwing it back to our honeymoon today…

I thought visiting Cannon Beach was a guarantee I’d see some sea stars and other interesting intertidal creatures. No such luck. When we got back to the hotel for the evening, Jeff and I set off to work figuring out what we’d do the next morning. Hitting up the beach again was definitely my priority. I was determined to see at least one dang sea star. I just wasn’t sure if we should head back to Cannon Beach and time our visit around tide times better or find some place new. In true ~us~ fashion, we decided that since our time was limited and the coast was just so magical we should check out somewhere new.

I started to tell Jeff about this spot I had found photos of when he said “…I think we’re looking at the same place!” That sealed the deal, I checked tide times, and the next morning we headed off to Hug Point. The internet promised waterfalls, caves, and access to tidepools. I could not wait!

oregon coast beach, hug point, pnw

We pulled in to an empty parking lot an hour and a half before low tide. The view as we walked down the stairs to the beach assured me we had picked the right spot. Almost immediately I spotted my second banana slug ever. I was over the moon! It didn’t matter what else I found or saw on the beach, I was pleased!

I couldn’t believe we had the whole place to ourselves. It didn’t seem real. In the morning light, Hug Point looks like a movie set. It was nothing short of magical. We wandered the beach, back and forth, waiting for the tide to go completely out. More creatures revealed themselves as each minute passed. It’s truly amazing how quickly the water drops (and in turn, how quickly it comes back in!)

We spotted many colorful sea anemones, interesting little fish, and exactly what I came to the coast looking for – sea stars! I was surprised how hard they were to see. In photos, it’s so obvious where they are but in person, they’re much better camouflaged. I concentrated on one specific rock that I felt was promising. On a part of the rock a bit further away, in water too deep to walk into, I could see a red sea star so I knew there had to be more. I finally spotted a purple one I could walk out to (with caution because the waves were too deep to squat in but when the water washed out I could bend down real quick to snap a photo.) After visiting the same one three or four times throughout the course of our visit I spotted two more that I had just walked right by. I was THRILLED!

oregon sea star, purple sea star, tidepooling oregon, hug point tide pool Hug Point anemones hug point

I still can’t believe Hug Point is real. It’s so close to Cannon Beach (just five miles south!) and in my humble opinion, a thousand times better. So why is it not overrun with people as well? It’s certainly strange but I’m very happy we were able to have that experience. We had the whole place to ourselves, aside from one guy with a dog, for over two hours. It was perfect. Easily my favorite beach experience, ever.

If you’re visiting the Oregon coast, Hug Point is a must!
xoxo

For more on our PNW trip, including hotel + food recommendations – check out this post. 

0 FacebookTwitterPinterestTumblrRedditEmail

it’s the little things…

by Kaylah Stroup October 9, 2018

like spending time doing the things that make you happy.

This post? It’s really just an excuse to share some photos from recent beachcombing trips. My love of the beach has a natural ebb and flow dependant on not only the season (cooler weather is always better!) but based on what I’m finding. Obviously, there’s no rhyme or reason to what you find on the beach on what day. It’s all random and no one can control what the lake decides to wash in. But one good day of finds will lead to me being there a lot more often the following days.

That’s what happened here. I spent the afternoon at the beach with my husband and sister-in-law over the weekend. She’d never been beachcombing before so Jeff and I were both very excited to share with her how fun and relaxing it is. I did not expect to hit the jackpot like we did though. Aside from lots of great blues, a couple red and yellows, and other awesome odds and ends, we found marbles! I’ve never seen a marble on this beach so when she raised something green in the air and said “what’s this?” I never expected that’s what it would be. I was super jealous but very excited for her and very excited to know that it was something I could possibly find some day.

Ten minutes later, I’m squatting down to grab a piece of beach glass that caught my eye when I watched a marble get washed in with the waves. It was SO incredibly exciting. I spend the next couple days going to the beach each day. Not specifically to look for marbles, although I certainly wouldn’t be upset if I found another, but because it reminded me how much I enjoy being there. Consider me 100% addicted to the beach at the moment.

I realize it’s just trash. Trash that the lake has tumbled and washed back onshore but there is just something so darn satisfying about it all. I love spending even the smallest portion of my day beside the water, listening to the waves, and searching for treasure. It’s so relaxing. It’s easy to just stay in, lay on the couch, scroll on my phone, and call that relaxing but actually getting out and doing something I love really does wonders for my mental health.

Lake Erie, I love you!

rainbow beach glass, lake erie beach marble from lake erie

Life is busy and can be stressful but don’t forget to take some time for yourself!
xoxo

For more of life’s wonderful small moments, check out the tag “it’s the little things”
If you’d like to find some beach glass of your own – 7 tips for finding beach glass & 3 best spots for beachcombing in Cleveland.
0 FacebookTwitterPinterestTumblrRedditEmail

earlobe reconstruction – one year update

by Kaylah Stroup October 8, 2018

It’s been one whole year since I got my earlobes reconstructed!

I had definitely planned to write so much more about the whole experience. Before getting it done, I pictured monthly updates after a couple initial posts about the procedure. I had trouble finding first-hand accounts on earlobe reconstruction and wanted to change that. Ya know, make it easier for other folks doing research. When it came right down to it though, there wasn’t much to say. The whole process was just so easy. Don’t get me wrong, it definitely hurt, and it cost a lot of money but overall, it was pretty uneventful.

I shared a post back in October of 2017 with lots of photos from shortly after it was done, my reasons for doing it, and a bit about the procedure. Read that here. Then four months later I shared a second update with more healing photos and info on how they were healing up. Read that here. Now I’m back one year after the initial surgery to update ya again. Spoiler alert, there isn’t too much to say. 

before – 38mm

the second day after surgery

one month after surgery

four months after surgery

six months after surgery

six months – finally pierced!

Not much has changed since my four-month update. Although visible in photos – because you’re literally staring and looking for imperfections! – I never notice the scars. They’ve faded so much in the past few months. My ears also feel completely normal. I know I mentioned in a previous post that the scars were a bit sensitive but I can’t even feel them anymore. They’re now soft (thanks to Bio-Oil which I massaged on them religiously!) Honestly, it’s like they’ve always been this way. It’s hard for me to imagine that they were ever stretched, especially so large!

I was so nervous before getting it done. I was very attached to my stretched lobes. I’d had them for over half my life, and like my hair, they were a huge part of my identity at least I thought so. Sometimes I forget they’re not still stretched. I still experience a brief moment of panic when I think I haven’t taken out my wood plugs before hopping in the shower. Every once in a while I’ll try to the shoulder bump to check if I have my plugs in for the day and feel panicked that I forgot to put them in before leaving the house. It’s wild how ingrained those little habits were.

Not once have I regretted the decision though. I am SO happy with the results. It was worth every penny, and every ounce of pain. I would do it over in a heartbeat.

Aside from the scars being less visible, the other big change in the last few months is that I got them repierced. John, who did the reconstruction, said to wait six months before thinking about getting them repierced. If the scars were soft enough, I could go for it. I was basically counting down the days until six months!

They were cute before they were pierced and now with the addition of all of the ridiculous earrings I’ve collected, they’re even more adorable!

Beetle earrings can be found here! They’re under $20!

I’m aware I’m a bit of a broken record at this point but I’m just so pleased with how my ears healed! If it’s something you’re even remotely considering, I recommend going for it. The idea of reconstruction seems so scary but it’s 100% worth it!
xoxo

0 FacebookTwitterPinterestTumblrRedditEmail
Newer Posts
Older Posts

About Me

About Me

Hello!

I'm Kaylah! Renovating a 150-year-old home in Northeast Ohio. Likely found in my garden.

Categories

  • all the posts!
  • animals + nature
  • beauty, fashion + hair
  • explore everywhere
    • abandoned
    • cemeteries
  • plants + gardening
  • reviews
    • books
  • some of my favorite posts
  • stroup mansion
  • window shopping

disclosure

click to drop down
The Dainty Squid is a for profit blog. and we participate in a number of affiliate programs meaning, at no additional cost to you, I will earn a commission if you choose to make a purchase through one of those links. For more details click here

psssst! while you're here, check out my stained glass. Dainty Squid stained glass

copyright 2026 the dainty squid / kaylah stroup. please contact me about photo usage.


Back To Top
THE DAINTY SQUID
  • blog
    • all the posts!
    • stroup mansion
    • some of my favorite posts
    • plants + gardening
    • beauty, fashion + hair
    • reviews
    • window shopping
    • explore everywhere
  • about me
  • contact
  • shop