THE DAINTY SQUID
  • blog
    • all the posts!
    • stroup mansion
    • some of my favorite posts
    • plants + gardening
    • beauty, fashion + hair
    • reviews
    • window shopping
    • explore everywhere
  • about me
  • contact
  • shop
Category:

beauty, fashion + hair

All things related to hair, beauty + fashion!
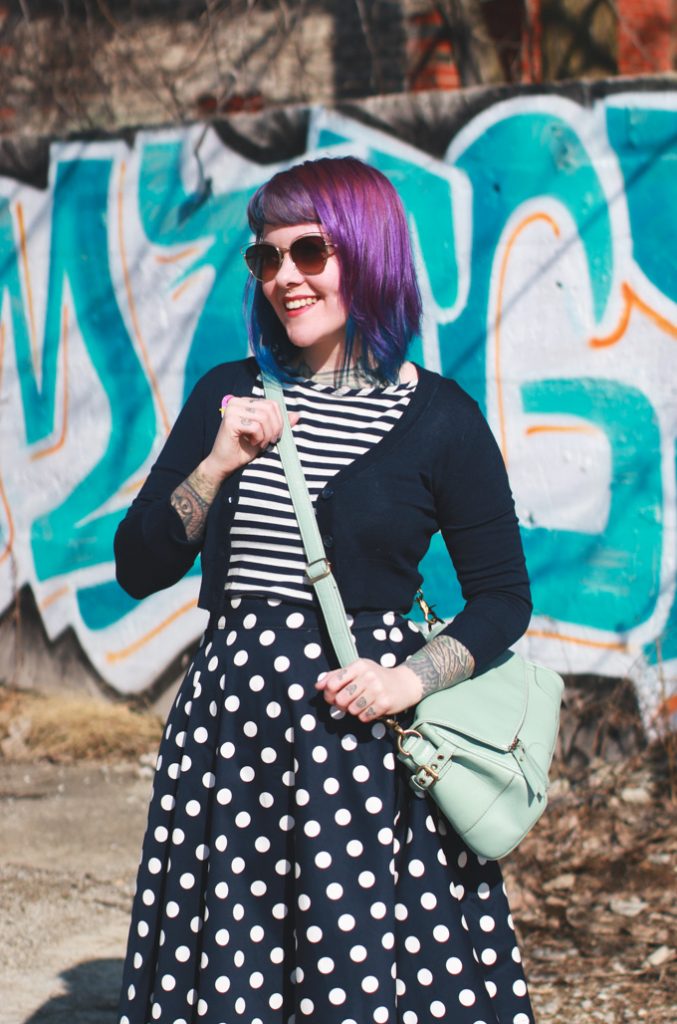
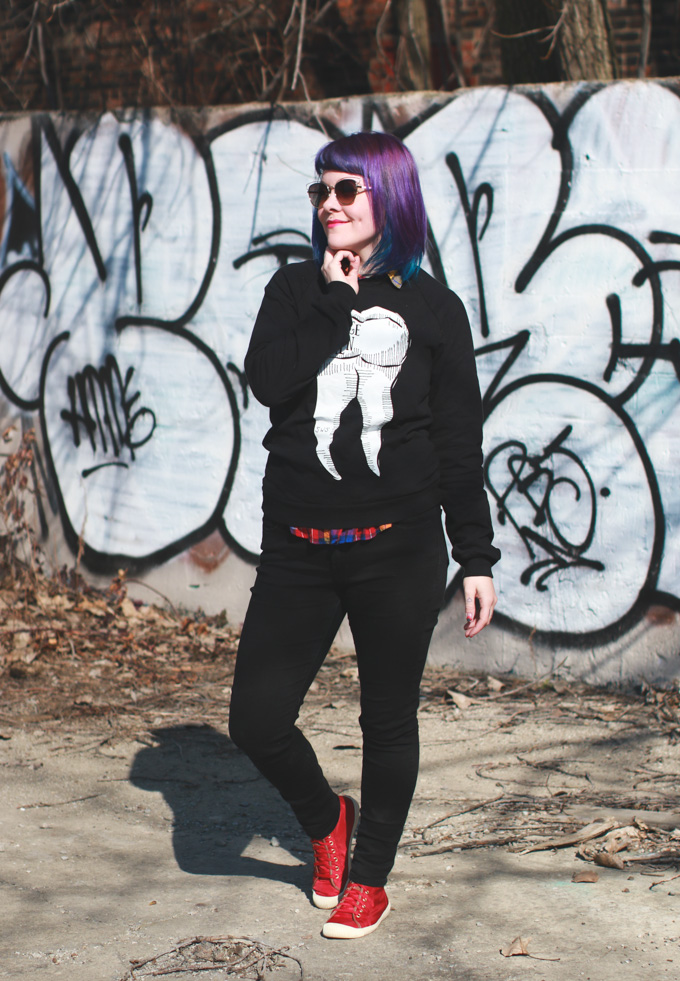
what I wore : a new favorite

by Kaylah Stroup April 28, 2016
green hair, black and white striped dress, wiw
Valley Cruise Press, jean jacket, denim jacket
green hair, cleveland blog, cleveland, blogger, fashion blog
fashion blog, cleveland


details 
sunglasses – Moorea Seal
jean jacket – thrifted
back patch – Valley Cruise Press
pins – dentures by Caitlin Stout, skull + root beer float by Valley Cruise Press
necklace – Moorea Seal
dress – Bold Habits Dress c/o Modcloth
shoes – Wheel and Zeal Sneaker c/o Modcloth
lipstick – Blush My Lips by Essence

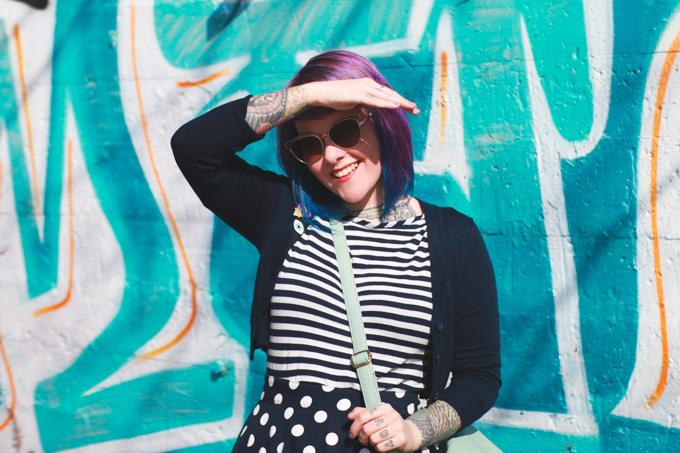
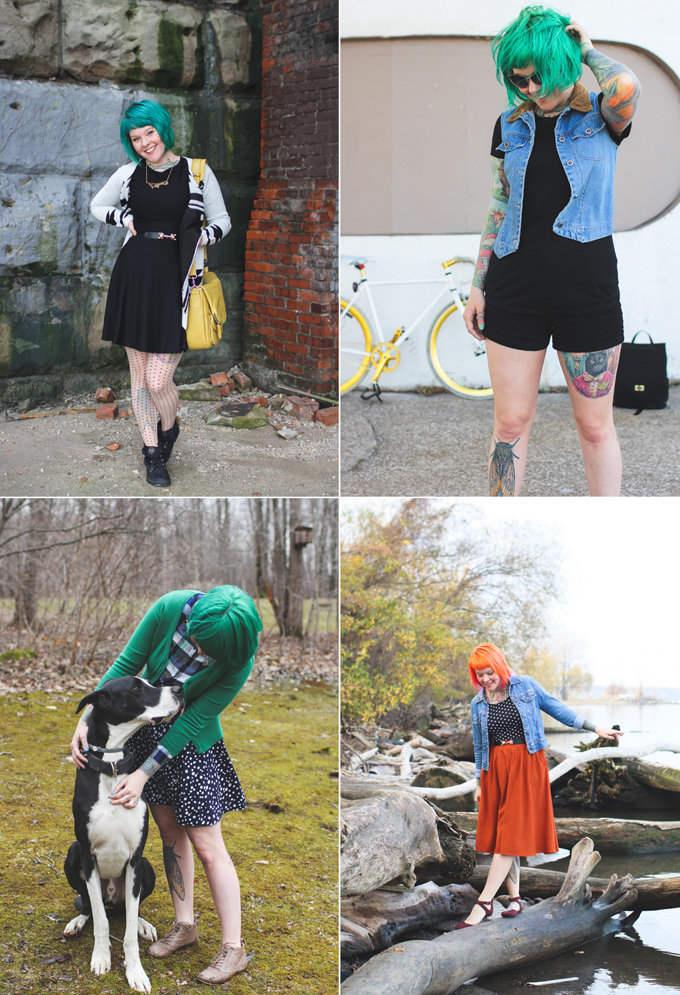
I’ve been trying to stay away from posting outfit photos in this dress since I felt like I’ve shared a lot of outfit posts with a black and white dress, and even a couple paired with my jean jacket. Seriously, this is basically the same outfit only three years ago! I consider this my ultimate outfit. Sure, I’ve styled outfits I really liked possibly more than this (like this!) but a black and white striped dress with a jean jacket is kind of my signature look. I feel most confident in this ensemble.

Anyway, I realized it had been a while since we saw my quintessential Kaylah outfit here on the blog so it seems like it’s finally time to show off  my new favorite black and white striped dress. It’s like the ultimate one. (Over half my dress collection is B+W striped, okay?) It’s long enough to not worry about showing anyone anything they shouldn’t be seeing. It’s lightweight which is perfect for summer. It has two large pockets so you could totally go purse-less if you wanted! It’s basically perfect. One of those things I want to buy multiples of, for sure!

Speaking of confidence, I’m realizing it’s something you need a lot of when you have green hair. I’ve been around the color wheel multiple times. I’ve even had a shade of green extremely similar to this one in the past but this time around, man, it’s been rough! I’ve written lots of posts about dyeing your hair fun colors, and maintaining it but something I’ve been thinking about touching on for a while now is dealing with other people’s reactions to your hair. It seems obvious that with a super vibrant colored hair that people will stare and make comments but I guess outside of your significant other’s opinion and that of your boss, it’s not something that people really consider when taking the leap.

With this green it’s rare that I leave the house and don’t have at least one person say something. Sometimes it’s nice, which I appreciate but the majority of the time it’s someone shouting from the passenger seat about how St. Patrick’s Day is over. “Aw, baaaabyyyy, I love the color green” is something I’ve been hearing a lot lately too. These things wear you down after a while. Being shouted at in public isn’t so great, even if it is a compliment. It can be really embarrassing. It makes me want to hide, to wear a hat, to dress as normally as possible. With friends it’s easier to deal with but alone it makes me feel very anxious.

black and white striped dress with jean jacket, outfit post, fashion blog, Cleveland blogger

I hesitate to even share these thoughts because inevitably someone will say something like “what did you expect?” or “if you don’t want the attention than why did you do it?” No matter what you say you’ll never talk sense into those kind of people. I guess I’m typing this because I just want to share my frustrations. To tell you how even after all these years I’m still not fully equipped to handle it. I have so much I want to say on the subject but sometimes it’s just easier not to talk about and to pretend it’s not an issue.

Anyway, lets end this post on a positive note. This hair color is the bomb dot com. No amount of dumb St Patrick’s Days are going to dull my shine. I looove the way children look at it/me. I feel like a cartoon character, in the best possible way. I could always go back to my natural color (lol, what’s that?) but I feel like myself in colorful hair, like this is the hair I should I have been born with. This whole look is me in full effect, it might generate a few stares and annoying comments, but dang it, I am adorable!
xoxo

.
0 FacebookTwitterPinterestTumblrRedditEmail

what I wore : stripes + polka dots

by Kaylah Stroup March 2, 2016
Cleveland Fashion Blog, polka dot skirt, kaylah doolan
pins, lapel pin
Cleveland Fashion Blog, purple hair, kaylah doolan
Cleveland Fashion Blog, polka dot skirt, kaylah doolan, purple hair


details
shirt – TJ Maxx
cardigan – Dream of the Crop Cardigan c/o Modcloth
sunglasses – Carine c/o Moorea Seal
lapel pins – Steve Buscemi via Space Waste, Eye via Coucou Suzette
skirt – Bugle Boogie Skirt c/o Modcloth
camera bag – Jo Totes
shoes – Blowfish Shoes

This is just one of those outfits that makes you feel like a million bucks… even if the wind is working against you. Blowing your hair every which way (bangs + wind = the worst) and giving you silly outtakes like the one seen below. Awkwardly grabbing my own boob in public, or in the process of pulling my sweater back in place? That’s for you to decide.

Sorry, I had to include that. I wasn’t expecting it so when I was scrolling through my photos I nearly had water come out my nose. I always think to myself that I’d like to share outtakes from time to time, but they get buried, and I eventually forget about them. Sometimes I feel like such a dork sharing all these posed photos of myself. I try to be “natural” but of course, in front of the camera, I try to stand a little straighter, make sure my hair is in place, and my clothes are sitting perfectly. I’m a little bit more disheveled than that. We all are. So in the future? More outtakes! I’ll save them up and even put them in a post of their own.

Hope you’re having a lovely Wednesday!
xoxo

0 FacebookTwitterPinterestTumblrRedditEmail

what I wore : a giant tooth

by Kaylah Stroup February 25, 2016
cleveland, blogger, tooth sweater, purple hair
Kaylah Doolan, Cleveland Lifestyle Blog, wiw
kaylah doolan, wiw, ootd


details
sweatshirt – tooth crew neck c/o Strange Women Society
button up shirt –  Old Navy
lapel pin – Hand Over Your Fairy Cakes
jeans – High-Rise Rockstar Skinny Jeans via Old Navy
sunglasses – Carine c/o Moorea Seal
shoes – Palladium Boots
I don’t have too much to say about these photos or this outfit except that sunshine, a new pair of jeans that fit well, my new favorite sunglasses, and the most perfect sweatshirt make me a very happy gal. That sunshine especially! *insert seven heart emojis*
xoxo


very important detail I couldn’t seem to capture in the sunlight.


0 FacebookTwitterPinterestTumblrRedditEmail

Bleaching your hair 101

by Kaylah Stroup February 4, 2016

In order to achieve bright colored hair, you have to bleach. There is no way around it. I’ll be the first to admit, it’s scary. Of course it is, this is what could hurt your hair and leave it damaged. You will need to bleach your hair even if it’s fair to begin with. Bleaching your hair not only makes it lighter but makes it porous so the dye can be absorbed.

This guide was written with a two different types of people in mind – those with hair that is already dyed a “fantasy” color and want to start doing it themselves, and those with light colored hair. If you have dark hair that is either dyed dark, or naturally dark this post may not be for you. My hair is fairly light to begin with so it’s pretty easy to me to achieve a light color. I am not a professional and I can only speak from my own experiences. Just be aware that everyone’s hair is different and will react differently to bleach.

When I first decided I wanted pink hair I had been dyeing my hair black for years and years. I knew nothing about hair so I went to a professional who over the process of a few months lightened my hair slowly to a light enough color that I was able to dye it pink. Because it’s something I’m not personally experienced in I really don’t have much to say about going from black to a bright color except that it’s very rarely possible to do safely in one step. Patience is key, and I would highly recommend going to a professional who is extremely knowledgeable in color. Take your time lightening your hair! Seriously, all the work you did to get from black to pink (or whatever color) won’t be so pretty when your hair is fried, looks like straw, feels gummy when wet, and takes forever to dry.

My bleach of choice is, and always has been, Beyond The Zone Radical Bleach Kit. It works like a charm. By the time I’m done applying it I usually only have to wait seven or eight minutes before my hair is nearly white and ready to rinse. I follow the directions on the package all except for the recommended time which in my opinion is extremely excessive. If you were to follow the time guidelines there is a very good chance your hair would be fried. My best advice is to peek up under the cap every few minutes to keep an eye on how quickly it’s processing.

A few days before.
I recommend bleaching a few days after making the decision to bleach. Not because you’ll change your mind or anything like that but because those few days will give you time to prepare. I use those days before bleaching to deep condition the heck out of my hair (which also helps with fading!) You want your hair to be in tip top shape before bleaching it. Here’s a list of my favorite deep conditioners, and I cannot recommend a boar hair brush enough. Boar hair brushes are great for distributing your scalps natural oils to the rest of your hair and your oils help protect your hair. When I know I’ll be bleaching my hair I try my best to use the boar hair brush every night before bed.

Day of.
I recommend not washing your hair on the day you bleach your hair. Like I mentioned above, oils protect your hair. I like to make sure mine is good and greasy so I’ll use the boar hair brush right before bleaching.

Follow the package’s direction, and get to applying. Not to stress you out or anything, but every minute counts. Don’t dilly dally around. If you have long hair make sure you have enough bleach mixed up before starting. For reference, my hair is on the thin side and at shoulder length one Beyond The Zone Radical Bleach Kit will cover about half of my hair. If I’m only doing my roots, which is usually the case, one pacakge is fine.

Don’t forget to put a shower cap on after applying bleach. You don’t want it dry up.

After bleaching.
You’ve checked in the mirror and your hair looks sufficiently light enough? Rinse it immediately! I try to rinse out bleach in the sink just so I don’t have it running all down my body. I do not use any products when rinsing out. Just make sure to rinse thoroughly. Like I mentioned above, part of the reason we’re bleaching is to make the hair porous enough to hold color. Conditioning your hair at this point would be counterproductive.

Now it’s time to dye your hair. I’ve never found a difference whether I wait until my hair dries or if it’s wet when dyeing it so it’s your preference – just make sure you’re doing it same day. Waiting until the next day will give your hair time to produce new oils that will effect how porous your hair is and how it holds dye.

A few more tips…
▴ It doesn’t have to be white or one even color after bleaching for it look great after dyeing. Just like “normal” hair colors, bright colors look best when they have more than one shade and aren’t a flat color.  I honestly think that’s the biggest factor in whether or not hair color looks good or not.

How light your hair needs to be depends on which color you’re trying to achieve. The blue-ish tint that the bleach left my hair in the photo above was perfectly fine for dyeing my hair pink/purple but probably wouldn’t have been acceptable for a shade of orange. Something to remember is that rules of color blending somewhat apply with hair dye too. The dark blue streaks the bleach left appeared purple when I applied pink dye to my hair.

▴ If possible, only bleach your roots. If your roots are getting long and that’s why you’re working with bleach, only apply the bleach to your new growth. Overlapping bleached hair makes your hair brittle in that spot. I recently shared my two tips for switching hair colors easily which should help eliminate any need to bleach the whole length of your hair if you already have an unnatural color.

▴ Do not double bleach. Meaning don’t rinse your hair after bleaching and start all over again…EVER. Your hair will need a resting period and a handful conditioning treatments before bleaching again. If your hair is dark most likely the easiest option will be to bleach, then dye your hair a color similar to what the bleach left you with and keep doing this over a period of time making sure to condition and baby your hair. Like I said at the beginning of this post, patience is key here.

▴ Have a friend help, if possible. If not, get yourself a few mirrors! The hardest part about bleaching (and dyeing) your own hair is getting the back. It’s super easy to miss pieces unless you can see. If you’ve got a friend willing to help ya, that’s awesome. If not, you’re not outta luck, just pick yourself up a handheld mirror. I do as best as I can then double check my work the handheld mirror. If you’re not confident in your skills find a way to rig your handheld mirror to something so you always be watching what you’re doing in the bathroom mirror.

If you have other any general hair questions, or questions about my hair – let me know. I’d love to share more hair related content on The Dainty Squid but I need to know what you want to learn about. I’m currently working on a hair color troubleshooting post so if you have any issues you keep running into, I’m all ears!
xoxo
You can find more hair dye tips and guides in my hair master post.

Save

0 FacebookTwitterPinterestTumblrRedditEmail

hello, pink hair

by Kaylah Stroup January 12, 2016
pink hair, the dainty squidpink hair, blue hair, beyond the zone, punky colours

When I make drastic hair color changes I like to share photos on the blog. See here, here + here. Sometimes it feels kind of funny, like right now, which is exactly why I’m over-explaining it. But I enjoy looking back at these posts for a multitude of reasons. One of which being I’m super forgetful. By the time I’ve applied dye to my hair I’ve usually already forgotten what I used. While what color your hair ends up really depends on what color it was previously, at least the way I change colors, it’s nice to have a point of reference for the next time I inevitably make my way back to this color.

I had let the orange grow out more than I normally do. It was probably the longest I had ever let my roots grow. See?! I just didn’t want to give up the orange but I knew if I redyed it I would regret it. When I finally bleached my roots the pieces of hair that bleach ended up on ended up being an even brighter orange then they were, which is sooo typical when you’re ready to switch colors. All that to say my hair was still VERY orange when I applied dye to it.

I decided to try and use only the dye I had in my cupboard. I have a pretty awesome supply of dye on hand. I have basically every color but of course, I didn’t have what I really wanted – any shade of pink. I mixed a boatload of conditioner with Punky Colour Purple for my top layers and used Punky Colour Atlantic Blue for the bottom. It ended up a little bit less perfect than I was hoping. It wasn’t awful but there was too much orange for my tastes. I definitely diluted it too much. You live and you learn, I guess. After all these years each time I dye my hair it’s still kind of like an experiment. You can see it in this post.

These photos are from after I touched up that dye job. I’m so much happier with this than what I ended up the first time around. I haven’t had pink hair in over seven years. It’s kind of a fun change. It sounds funny for someone who has had orange hair for the past few months to say but I haven’t been all that adventurous with my hair this last year or so. I’ve been sticking around colors that I do often and haven’t been branching out into new combinations. This is definitely a new one for me. 

This is Beyond The Zone Bubble Head Pink, some more Punky Colour Purple, and I hate to admit it… Ion Color Brilliance in Radiant Orchid on the top layer. I also touched up the Punky Colour Atlantic Blue. I hadn’t used ION Color Brilliance since around the time they came out. I hated them then. They have a lot of nice looking colors though, and the price certainly makes them tempting. I thought maybe in the last four years they’d have improved their product. Nope. The second I started applying it I regretted not being more patient and waiting a day or two to grab some Punky Colours instead. Hilariously enough the color barely even showed up once rinsed out but it sure did make a mess of my shower… and towels …and everything else for like a week. I legitimately don’t even know where it was coming from.

Because the main color used is already fading (Beyond the Zone dyes are an okay stand in but kind of an awful idea for using on the majority of your hair) I’m looking forward to touching it up in a few weeks with a slightly different color combo. Maybe I’ll keep the pink or I might go purple instead. Who knows!  For now I’m liking this.
xoxo

Psst. If you have any hair questions or are looking for some tips, check out my hair masterpost! 

0 FacebookTwitterPinterestTumblrRedditEmail

Favorite Outfits from 2015

by Kaylah Stroup December 28, 2015
little black dress // windblown // plaid, polka dots + pups // orange you glad
good vibes only
swans + summer legs // birthday attire // black + white // owl keep you
one year
“just jeans” // hello to the perfect coat // bikes, bikes + more bikes // #iamunique
pattern clashing champ

Every year, at the end of the year, I make a little list of my favorite outfits that I shared on the blog. It’s a fun way to look back and see all the outfits I put together, and the different hairstyles, and colors I had. (Did I really only have three different colors this year? I’m slackin!) No real revelations here, my style seems just as random and obnoxious as ever. I’ve always kind of wished I had a really distinct style but perhaps my style is less random than I think and it’s just that it’s hard to see because I see it everyday?

I don’t normally choose a number one from my list of favorites but I really can’t get over the outfit in the photo above. It is easily one of my all time favorite outfits. I don’t think I’ve ever felt as fierce as I did in that. That needs to be something I wear more often. Also, if my hair could just permanently look like it does in that photo that’d be great! Hah!

This past year I shared the smallest number of outfit posts since I started sharing them back in 2011. I’m hoping to get back to sharing outfits more frequently in 2016.
xoxo


See past years favorite outfits : 2011, 2012, 2013 + 2014.
And of course, you can find more outfits under the “what I wore” tag.

0 FacebookTwitterPinterestTumblrRedditEmail

what I wore : hello to the perfect coat

by Kaylah Stroup December 9, 2015
Steve Madden Coat, wiw, ootd
palladium boots, what I wore, orange hair
Jo Totes, Kaylah Doolan, What I Wore
The Dainty Squid, Palladium Boots
camera bag


details
coat – When in Rome Coat c/o Modcloth
sweatshirt – Hello Apparel
button up shirt – Classic Plaid Poplin Shirt via Old Navy
necklace – All Seeing Eye Pendant c/o Moorea Seal
jeans – TJ Maxx
boots – Palladium Boots
camera bag – Jo Totes
phone decal – Society6
sunglasses – c/o Moorea Seal

This coat is what all my coat dreams are made of. I got it at the beginning of last month but I had chosen the wrong size. I spent SO long standing in the mirror posing, and making sure it really was too big just because I didn’t want to take it off and send it back. I was trying to justify that winter coats should always be a little bit big so that you can layer but there really was no denying it, I was swimming in it. I finally got the size I needed back in the mail a week or so ago aaaand I don’t remember the last time I liked a coat so darn much.

I actually own quite a few coats but no real winter coats that provide warmth. I guess I skated by without a warm coat for years because I never really spent all that much time outside in the winter. It was just quick trips outside or else I was super layered up. Now that I’m spending so much time at the flower shop having something to keep me warm on the walk became a necessity. This baby is the perfect length. Don’t kid yourself, coats that don’t cover the booty are never warm enough! The inside is super soft. It has this puffy collar that keeps the wind out of your hood. My favorite part? The sleeves! They’re sufficiently long enough which is something I’d been having trouble finding, and the ends have a form fitting warm part so that your wrists don’t freeze. Also, the pockets are super deep which is always a plus! I’m in love. Picking things out online is hard sometimes, and when you absolutely nail it it feels so good.

Not to rush the snow, because I know that as soon as it comes I’ll be sick of it, but I’m really excited for it to start falling. I have a Christmas tree up for the first time in a few years but it feels kind of out of place. It doesn’t seem like it’s creeping up so quickly. I mean, I haven’t even started shopping for gifts yet. Snow always makes the holidays feel real and I’m excited to really test out my new coat.

Hope you’re having a lovely week (+that you’ve found your perfect winter coat because that cold weather is coming quick!!)
xoxo 

0 FacebookTwitterPinterestTumblrRedditEmail

2 tips for switching hair color easily

by Kaylah Stroup December 8, 2015

One of the main questions I get about my hair is how I seamlessly change colors so drastically. This post, of course, is really only relevant to unnatural colors done with brands such as Punky Colours, Manic Panic, Special Effects and the like. I also need to give my normal spiel about not being a professional, having no formal training, and that everything I know is from personal experience. That’s not to downplay what I know though, I’ve been dyeing my hair unnatural colors for over eight years. I’ve got it pretty much down to a science.

Below is a perfect example of what my typical timeline looks like and what I’ll be explaining in this post. Blue in June, purple in July, and orange in August – easy peasy and with minimal damage! This is a fairly regular cycle for me. I change my hair color every two or three months depending how quickly I get bored.

How to switch hair colorsHow To Easily Switch Hair Colors

When my hair was professionally dyed pink for the first time around eight years ago I knew nothing about hair! I had been dyeing it black since I was around fourteen and the extent of my knowledge was how to apply box color. But since stripping the black from hair and dying it pink no one else has touched my hair color. It costs a fortune, and after a spending a great deal of time researching I realized I could easily do it myself. I’ve always loved switching colors, and in all my years the two biggest tips I’ve found that help are…

▴ Let your current hair color fade. Y’all, I take a lot of pride in my hair. I try to always keep root growth at a minimum and my hair color bright. I’m pretty embarrassed by faded hair but sometimes it is a necessity!

I let my hair fade naturally for as long as I can stand it. Then when it hits me that “I have to change hair colors now!” I give myself a few more days. In those three or fours days, hopefully longer, I will purposely fade my hair to the best of my ability. I’ve never been a fan of bleach baths, using dish soap or anything else like. To fade my hair I rinse with hot water, take baths where I actually let my hair soak instead of keeping it dry, leave shampoo in a little bit longer than normal, and do conditioning treatments at least once a day. The conditioning treatments are especially helpful because before bleaching you obviously want your hair is the best condition possible. You can find a few of my favorite deep conditioning products in this post.

The three photos above show examples of what my hair looked like at it’s best during those dye jobs, not what it looked like before being bleached and moving on to the next color. 

▴ Use the color wheel. That’s my big “secret”, which totally isn’t a secret at all but it is an important thing that is easily overlooked. I never want to say that something isn’t possible or that you can’t do something but there are definitely colors that are harder to switch between.

watercolor color wheel by Mara Mattia

While my color changes may seem dramatic they are carefully thought out. I’ve found that it’s easiest to work my way around the color wheel instead of skipping around. For example if you have bright pink hair, it’s much easier to move a few shades over on the wheel to orange, instead of rushing right into green. Is it possible to go straight from bright pink to lime green? Maybe but it’s going to involve bleaching your hair to a lot lighter of a color first. You obviously don’t have to stop at every single step on the color wheel, just keep it in mind when deciding on your next color.

Using the color wheel as a guide is what I consider my best weapon for fighting damage. My color changes are smooth and cause minimal damage because I’m not bleaching the entire length of my hair to switch colors and the color itself doesn’t cause any harm. I normally just bleach my roots and that’s all.Since I’m not bleaching the whole length there is obviously still color in my hair when moving to the next shade. Following the color wheel ensures that my next color won’t mix poorly with the color remaining in my hair. Mixing complementary colors will result in a muddy hair color which is something you want to avoid.

purple hair, hair dye

If you have other any general hair questions, or questions about my hair – let me know. I’d love to share more hair related content on The Dainty Squid but I need to know what you want to learn about. xoxo

xoxo

June 2019 update – I have a video transforming green hair to orange here! I’m still pretty impressed with how it turned out!

You can find more hair dye tips and guides in my hair master post.

1 FacebookTwitterPinterestTumblrRedditEmail

Liquid Palisade Review

by Kaylah Stroup December 1, 2015

Recently I was offered a sample of Liquid Palisade, a product I had never heard of before but I was instantly intrigued and I think you might be too! Put simply it is an easy-peel nail polish barrier. It comes in a small tube with brush, something very similar to what liquid eyeliner might come in. You paint it on before using nail polish, let it dry, use your nail polish as you normally would, and then peel off Liquid Palisade along with any mess you may have made. Clean cuticles every time! Genius, right?!

I’m not a messy nail painter. I owe that to spending a few nights a week painting and re-painting my nails for basically as long as I can remember. What really sparked my interest was the idea of using the product to create interesting designs. Liquid Palisade comes in two different styles, one with a thick brush for easy coverage of your cuticles, and one with a skinny brush meant for masking off parts of your nail for easy multi-color designs.

Skinny brush on the left is “Liquid Palisade French Manicure Easy-Peel Polish Barrier“
Thick brush on the right is “Liquid Palisade Easy-Peel Polish Barrier“

Like I said, I was really excited to use it for making designs. I figured it had to be easier than using the stickers I use currently. I painted my nails, let them dry, then began applying Liquid Palisade where I didn’t want the next color to be. Similar to the way that oil and water never really mix, the line of Liquid Palisade I painted on just rolled away. I tried applying the product thicker but no matter what it would never stay exactly where I put it.

The directions say “Apply a thick layer below tip. Allow to dry, and shape with orange stick.” I didn’t experiment too much with the orange stick because I found that touching the dried product made it roll up and become unstuck from my nail. I guess if you spent enough time “shaping” the product maybe you’d have some luck. My complaint is that it’s just not precise. Getting a line that is perfectly straight is nearly impossible. It seems like a waste of time and money to fool around with it when you can easily get crisp, clean lines by using super cheap stickers.

The bottle with the larger brush was something I could actually see being practical though. Above is an example of what it looks like applied, and with nail polish messily painted on. As you can see on the right side, it peeled right off. It’s pretty impressive… and if you love peeling things off you will love this! I can see this product being useful for children who are just learning to paint their nails, people who no matter what still can’t seem to keep the polish only on their nails, and designs that involve a mess like water marbling or splatter techniques. 

The bottle is very small but I would assume that just like liquid eyeliner in an equally small tube this is going to last a loooong time. I painted all of my nails multiple times with the french manicure one, which has the smaller brush, and didn’t even make a dent.

Drying time obviously depends on how thick you lay the stuff on but in general I found it dries in no time at all. By the time I did my whole hand the nail I started on was dry and ready to paint.

I’m pretty torn on what my end feelings on Liquid Palisade are. Is it something I will repurchase? Probably not. I normally don’t post reviews on things I’m not 100% sold on but like I mentioned above, I do definitely think it could be super useful to the right person. I know there are tons of people out there that no matter how much practice still aren’t able to paint their nails without getting some on their cuticles. This product could save you tons of clean up time and q-tips!  

Have you ever tried Liquid Palisade or any similar products? I actually saw that some people use regular old Elmer’s Glue for the same purpose albeit it takes a lot longer to dry!
xoxo

0 FacebookTwitterPinterestTumblrRedditEmail
Newer Posts
Older Posts

About Me

About Me

Hello!

I'm Kaylah! Renovating a 150-year-old home in Northeast Ohio. Likely found in my garden.

Categories

  • all the posts!
  • animals + nature
  • beauty, fashion + hair
  • explore everywhere
    • abandoned
    • cemeteries
  • plants + gardening
  • reviews
    • books
  • some of my favorite posts
  • stroup mansion
  • window shopping

disclosure

click to drop down
The Dainty Squid is a for profit blog. and we participate in a number of affiliate programs meaning, at no additional cost to you, I will earn a commission if you choose to make a purchase through one of those links. For more details click here

psssst! while you're here, check out my stained glass. Dainty Squid stained glass

copyright 2026 the dainty squid / kaylah stroup. please contact me about photo usage.


Back To Top
THE DAINTY SQUID
  • blog
    • all the posts!
    • stroup mansion
    • some of my favorite posts
    • plants + gardening
    • beauty, fashion + hair
    • reviews
    • window shopping
    • explore everywhere
  • about me
  • contact
  • shop