THE DAINTY SQUID
  • blog
    • all the posts!
    • stroup mansion
    • some of my favorite posts
    • plants + gardening
    • beauty, fashion + hair
    • reviews
    • window shopping
    • explore everywhere
  • about me
  • contact
  • shop
Category:

all the posts!

abandoned in the desert 2015

by Kaylah Stroup September 14, 2015

Last year Jeff and I took a pretty epic road trip (six states and 3,204 miles of driving). During that week we stumbled upon abandoned building after abandoned building in the middle of the desert, this year’s trip was no different. There were so many. Driving along roads less traveled and even the highway it’s so exciting to look out and spot these places, just waiting for us. There is just this rush of excitement, and a sense of discovery. Some of my favorite memories from both of those trips, and our relationship in general, include these places.

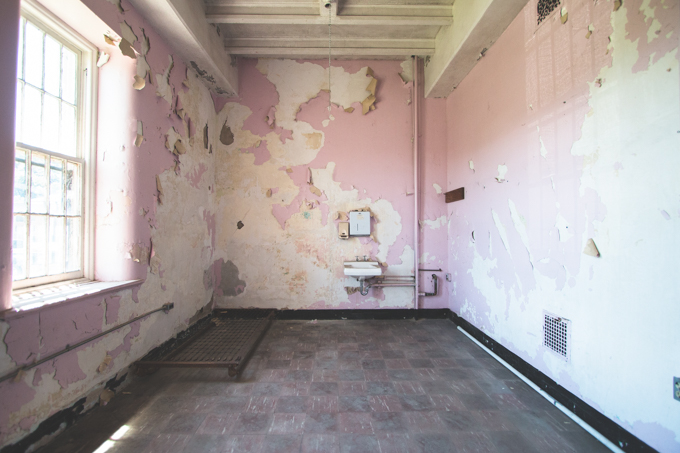
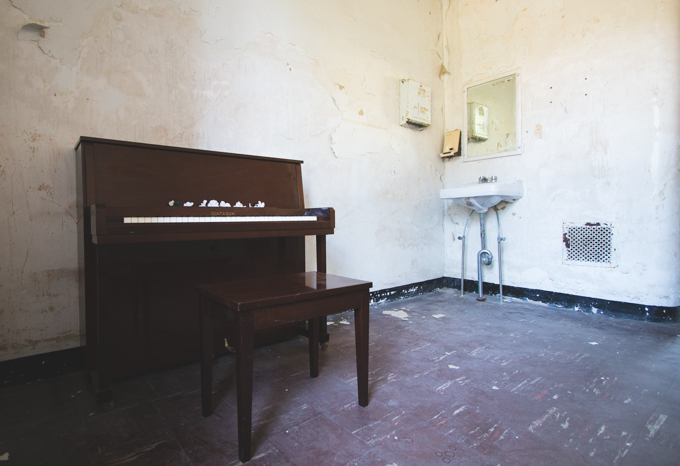
There’s just something about abandoned buildings in the desert. They have a different feel, a different smell, just another vibe altogether. In the Midwest abandoned buildings are musty, and most suffer from water damage. The freezing and thawing year after year ages them so much more quickly. They generally just feel rotten. In the desert you could almost describe the buildings as “crispy”. Everything is sun bleached and dried out.

I find the couch in the photo of above particularly funny. I really really don’t understand how it’s in such great condition. I guess it once again goes back to the lack of precipitation out there because I can say without a doubt if that thing was in Ohio it would be covered in moss at the very least.

I’m missing the desert a lot today. …But that’s nothing new. I look forward to visiting again, in the mean time I’ll just be dealing with all the feels that these photos leave me with.
xoxo

 You can find more posts from our road trip under the “travel” tag. 

0 FacebookTwitterPinterestTumblrRedditEmail

Skull Cleaning 101

by Kaylah Stroup September 10, 2015

Cleaning skulls. Oh, what a topic! I’ve gone back and forth in my head a million times – is this something I should blog about? It’s one of my favorite hobbies, something I pride myself on knowing a lot about, and I definitely feel that I have information worth sharing but it’s a sensitive topic for a variety of reasons. Blogging about it I run the risk of scaring away readers who are offended, grossed out or simply just not interested. But like I mentioned above I have information I want to share. When I first started this hobby I had the hardest time finding answers to my questions. Even as a beginner there was a lot I read that I immediately could see was misinformation. I’ve learned so much just by trial and error.

I am an extremely visual person. I can gather more information from one photo than I can from a few paragraphs but because this can be such a graphic process I will not be sharing any photos of unfinished skulls. This just isn’t the place. I will share as much detail as possible though so if this isn’t your cup of tea, I suggest you scroll on right now. I’ll be back with your regularly scheduled programming tomorrow.

Obtaining skulls.
There are lots of different places to get skulls. My two main sources of skulls are the woods, I find them on hikes, and my dad’s friend from work. He hunts, and has no use for the heads so he sends them my way.  Mickey, my good friend who is a taxidermist, recently wrote post on ethical taxidermy and how the term varies greatly because ethics are subjective. It’s an important read and it’s important for you to decide for yourself what is okay. I would never kill for my collection, and I certainly hope you wouldn’t either but being able to use a part of animal that someone else would otherwise just throw away is perfectly fine by me.

The best way I can recommend to get skulls is to let people know to keep their eyes open for you. Put out feelers. People won’t know to give you skulls unless they know you’re interested!

Just a reminder that, in most states picking up roadkill is illegal without a permit, so do your research if that’s a route you’d like to take! And if you’re in the US – stop picking up bird skulls. Bird law is real.

Gather your supplies.
I have a locker in my dads garage filled with my supplies, inside are…
▴ Gloves. Elbow length & regular disposable rubber ones.
▴ Heavy duty vinyl apron. You don’t want to splash anything on yourself, believe me.
▴ Respirator. Maceration is very smelly process, more on this below.
▴ Scalpel handle and blades.
▴ Field instrument kit. You don’t actually need everything in this kit but I’ve found it incredibly helpful!
▴ Bucket with lid. The container some kitty litters come in works too!
▴ Peroxide. Not bleach. Never bleach.
▴ Small container only slightly larger than the skull you’re working on.
▴ White Elmer’s Glue.

It’s always a good idea to have an extra pair of gloves and a few plastic bags in your car or camera bag if you’re hoping to find skulls while you’re out and about. Nothing worse than finding a great specimen and having no way to transport it.

Cleaning. 
There are lots of different ways to clean a skull. My method of choice is maceration. I simply skin the skull. (There are tons of tutorials online on skinning, it does take a bit of practice.) Then plop it in a bucket full of water. The bacteria eats away the flesh and after a period of time you’re left with a clean or mostly clean skull with fairly minimal work.

Hair is not broken down by maceration so you’ll be saving yourself lots of time by skinning the skull first. You’ll also want to remove eyeballs which is where the field instrument kit from above will come in handy.

I like maceration because it works well on animals in all different stages of decomposition. It’s obviously best on “fresh” flesh, the bacteria will flourish. Even with skulls that have dried or mummified flesh on them soaking them in the bucket will loosen anything so it’s easily removed. Another up side to maceration is that everything is contained so there’s no worry of another animal running off with your skull or losing any pieces during the cleaning process. The downsides are that is smells REALLY bad and it can take a while.

Most people you who use maceration as their cleaning technique keep their water at a constant temperature using an incubator or aquarium thermostat. Keeping the water warm helps provide the bacteria with a great habitat to live, and multiply. I actually don’t use any sort of water heating though. Simply because I don’t mind if it takes longer.

How long maceration takes really depends on the temperatures, and how large the animal is. I would say on average it takes 3-4 months for a skull to be finished without regulating the temperature.  It’s a good idea to change your water at some point during the period if it gets particularly nasty.

Let me just reiterate one more time – maceration stinks. It’s probably one of the worst smells you’ll ever smell. Do not do it in your house, and don’t do it if you have a very small yard. Wear a respirator and if a friend is kind enough to let you do it on their large piece of property bring spare clothes because you’ll probably smell afterwards.

Maceration tips.
▴ Be patient. Maceration takes time, especially if you’re not regulating your temperature. I process skulls at my parents house since they live on seven acres. If I’m feeling particularly impatient I will take them out and do a little bit of work with my field kit, cutting off any flesh I can just to speed up the process. Wear your respirator if you do this, please!
▴ It’s a good idea to wrap skulls in cheesecloth or even old pantyhose before putting them in water. You want the liquefied tissue to be able to leak out yet you don’t want to lose the little pieces, like teeth.
▴ Don’t forget about your skulls. When you first start out the excitement will make it really really hard to forget about skulls you have soaking but after some time it is kind of easy to forget if you have anything processing or not. If left in water too long skulls can become weak, and brittle.

Whitening + Finishing Up.
After macerating you may need to do some finishing touches such as removing connective tissue. Use your field kit to remove any remaining tissue. EVERY SINGLE PIECE. Anything, I mean anything, left will start to smell eventually. Take your time looking over the skull and making sure there is nothing but bone. Gently hose down the skull, I wouldn’t recommend bringing it in the house at this time. It will most likely have a stench to it still.

Find a container only slighter larger than the skull you’re working with, fill it with peroxide and add the skull. Never ever ever use bleach. I don’t care who told you or where you read it was okay but it is not. Bleach ruins skulls. I don’t cover my skulls once they’re in the peroxide and I do leave them outside. The sun will help speed up the process. Depending on the size of the skull and the condition it’s in it shouldn’t take too long at all for it to whiten. Generally I’d say it takes three to four days, sometimes less and sometimes more.

After the peroxide bath I bring the skull inside, rinse it off then wash it with dish soap, rise again and set it on a wash cloth to dry. After they dry I start putting everything back together. Regular old Elmer’s Glue is what I use to glue the mandible back together and the teeth back in.

To glue the mandible back together I simply put glue on one side and squish the two pieces together. I set them down on a table, still holding them together, and place the skull on top making sure they fit together perfectly. If they do you should be able to leave the skull on top of the mandible while it dries. Just be careful not to bump it for the next twelve hours or so. Sometimes it’s a pain, and takes a bit of fiddling around before you can get them to balance perfectly.

skull collection, skulls, skull cleaning guide

This + That. 
▴ I recommend the book Animal Skulls : A Guide to North American Species. It is a must have if you’re cleaning skulls. It’s a little bit pricey, even used but it’s so worth it. It has photos, measurements, and tons of information to help to correctly identify skulls. My favorite part are the life size illustrations of skulls.
▴ Sometimes I get comments wanting to know how I get skulls to look so nice, or so white and on top of all the information that I shared above it really depends on your specimen. Below are two cat skulls I have in my collection. The one on the left was found on the side of the tracks. Nature had already done the dirty work for me. The cat on the right was cleaned from start to finish by me. Other than just the nasal bone and a few teeth missing the skull on the right is a lot more weathered. No matter how long I soaked it or whatever, it would never ever look like the skull on the right. Generally speaking, skulls you clean yourself will be of higher quality than what you can find already cleaned.

This is obviously not an all encompassing post on skull cleaning. Like I said, there are lots of different ways, this is simply how I choose to do mine. I recommend doing as much reading on the subject as possible. Take pieces of information from many sources to find exactly what works for you. Just remember; don’t bleach and don’t boil! Good luck! If you have any questions, let me know!
xoxo

Save

0 FacebookTwitterPinterestTumblrRedditEmail

Propagating Succulents 101

by Kaylah Stroup September 3, 2015

I haven’t been propagating succulents all that long but I’ve already learned quiet a bit and seen a great deal of success. Nearly every time I post photos of my babies on Instagram (…which is quite often) someone asks for help or exclaims frustration in their failed attempts to propagate. Propagation is incredibly simple once you know what you’re doing and it’s wildly satisfying! Today I’m going to share my method and a few tips that have helped me along the way.

Above left : Properly removed leaf

Above is the perfect example of a plant that has gotten leggy due to lack of sunlight, and is in prime condition to propagate. I went to my favorite local garden center specifically to find a plant for this post. This one had already begun dropping it’s leaves and growing pups in the container.

What you’re going to do is remove the leaves. It’s very important to remove them properly. I genetly twist them from side to side, holding near the base. You’ll feel a little snap when it comes off. You need to be careful not to rip the leaf or else it will not grow. There should be no piece of the leaf left on the stem. When I first started that’s what I was most nervous about; removing my first leaf. It’s really simple and after your first one it’ll be easy peasy!

Below :  Improperly removed leaf that will not grow

Remove all leaves that are a great distance apart from each other. After that you’ll be left with a pretty little rosette on a long stem. Your rosette may be made up of just three little tiny leaves, or a handful of larger ones it all just depends on the condition of your plant – either way it’s worth saving. Chop those bad boys off using sharp scissors, leaving an inch or so of stem. You’ll be able to plant them later.

Now you need somewhere to put all your leaves. I use a cake pan. It’s what I had on hand and it worked! I would never recommend something that doesn’t have holes in the bottom for your plants but because you’ll never actually be thoroughly watering the leaves or pups it doesn’t really matter. I fill the pan with cactus soil and perlite. (both of which can be found at Lowes, Home Depot or any garden center) I use approximately a 2:1 ratio. The perlite is important because it helps loosen the soil, and prevent compacting which helps with new root growth.

I lay out the leaves, and rosettes with the short stems on the soil/perlite mix and leave them alone for a couple days. The ends need to callous over or else they’ll absorb too much water and rot. After a few days I start spraying them with a squirt bottle. They don’t need much at all, just a quick mist. I do this daily. There are no hard and fast rules about watering your plants though. The best thing you can do is keep a close eye on them. Check on them every day, if they look dry, mist them. If not, leave them alone. Keep in mind that leaves without pups need less water than those showing growth.

They’re going to need lots of light to grow. Depending on your climate and your home just having your pan of leaves near a window should be sufficient. Leaves and the baby plants you’ll be growing are delicate; too much sun may burn them. After getting fairly comfortable with propagation I moved my babies outside where they receive maybe three or four hours of direct sunlight every day and they’re thriving. I wouldn’t recommend direct sunlight when you’re first starting out though. Start by a window that receives lots of natural light during the day.

Now it’s time to wait. Patience is important here! It’ll take a few weeks, some plants take waaaay longer than others, but eventually you’ll start to see growth. Keep misting regularly! The mother leaf will start to shrivel. I never remove it, I just let it shrivel up completely but if you do decide to remove it once you have decent sized new growth be sure not to accidentally rip off the roots.

When my new plants have grown to about the size in the photo above that’s when I start replanting them. They’re still very delicate and will need misted often. When replanting I use 3:1 or 4:1 cactus to perlite mixture. With ample water and sunlight your new babies should continue to thrive!

Everything in focus below is something I propagated myself

Tips for propagation success!
▴ SPRAY BOTTLE. Buy one, use it, be amazed! No, but seriously, you need one. If you try to just water your leaves and cuttings as you would a regular plant you’ll most likely drown them.

▴Don’t forget about the stem from your plant you took the cuttings from, that will produce new growth as well! Since it already has established roots it will produce growth much faster.

Growth on the stem after a few weeks
Growth on the stem after four months

▴ I once read “If it looks like a plant, plant it” and that tip has been invaluable. It seems so obvious now that I have an idea of what I’m doing with plants but as a beginner it completely opened my eyes to everything that I could propagate. Below is an example of something that I would have never thought to do anything with. That cactus is now what I would consider a mother plant, every time she produces new growth like the two bunny ears shown in the photos I remove them to make new plants. I’ve had nothing but success with that cactus and the pups, they root beautifully! This is a very general rule but if you can twist it off, like the leaves of succulents, you can grow it.

If it looks like a plant, plant it.

While researching propagation before I started I noticed that nearly everyone had a slightly different method, varying most when it came what to do after the leaves have calloused over. I decided to just do a mix of everything I read. It works wonderfully for me. If my method doesn’t work for you I definitely suggest doing more research. Don’t give up after one failed attempt! Propagation is WAY too much fun. You’ll be amazed how proud you can be of one tiny plant.

Good luck!
xoxo


To see more photos of my plant collection browse the “plants” tag or follow me on instagram.

Save

Save

Save

0 FacebookTwitterPinterestTumblrRedditEmail

It’s the little things…

by Kaylah Stroup September 2, 2015

 like watching the sun set with my puppy dog.

Earlier in the week I had the idea that Jeff and I could go watch the sunset at the beach. It’s been a while since I’ve just sat on the beach and watched the sky do it’s thing. Much to my dismay he’s in the midst of wedding season and is swamped with work. I pushed the idea out of my head and got back to doing my own work.

A few hours passed and I looked up from my computer to see the sky filled with gorgeous shades of pink and blue. I thought to myself “eh, it’s probably too late by now.” Fifteen minutes or so went by and I looked up again to see it was just getting prettier. I quickly packed up my camera bag, threw Klaus in the car, and headed to the beach. I should clarify that throwing Klaus in the car simply entails opening the car door. That dog loves car rides, especially because they usually mean going to grandma’s house.

We arrived just in time to see the colors in the sky peak. Klaus was very nervous. I’d never taken him to this beach before which is pretty busy on a summer evening. We walked to the edge of the water where I picked a nice rock to sit on. He nervously sniffed everything, nibbled on grass, and uneasily eyed everyone. Eventually he sat down beside me, I wrapped my arm around him, and we stared off into the distance together. I smooched him on the head a half dozen times because c’mon puppy heads are for smoochin’ before realizing how silly we must have looked to the people behind us. Just a girl  on a date with her dog. But it was so so soooo nice!

I had planned on taking more photos but my concern laid more with making sure Klaus felt comfortable.  These five shots are the only ones I took that night. I shot with a high ISO so I could shoot quick which resulted in grainy photos. They’re not beautifully composed but they’re already very special to me – mine and Klaus’ first sunset on the beach together – definitely not our last.
xoxo

The little things is an on-going series celebrating the little things that make life special. 

0 FacebookTwitterPinterestTumblrRedditEmail

Pouch Update : Anatomical Models + All Things Tooth Related!

by Kaylah Stroup September 1, 2015
 The fifth round of limited edition pouches are available today.

You guys, I am SO excited about this batch!!! They are weird, and they are wonderful! There were originally only three prints. I know I mentioned it before but package was stolen directly out of my mailbox. I’m still feeling equal parts violated and like I got the last laugh. I’m sure whoever stole it felt pretty darn stupid when they opened it up to see denture print fabric staring back at them.  I’m guessing the fabric is laying in an alley somewhere because seriously, what else would they do with it?! ANYWAY once I reordered the fabric and received it I was just so in love with it I knew I had to expand the collection and get two more prints made.

There are five different prints, and three different sizes. It’s really hard for me to pick a favorite of the bunch. I am awfully fond of the tooth related pouches one though. They’re definitely going to appeal to a niche market but I enjoy being able to make things that are completely my style. Hope you like them too!

The pouches are available for purchase here! Just
like the past collections, these are limited edition. There is a very
small number of the larger pouches since they use up so much fabric. I
wouldn’t hesitate if you’re interested in grabbing one. Once
these ones are gone, they won’t be restocked and the fabric won’t be
reprinted.
xoxo 


PS. If you purchase one of these or one from any previous collection – I wanna see pictures! Tag me on instagram or even shoot me an email. 

PPS.  If you have any suggestions for future collections, I am all ears!

0 FacebookTwitterPinterestTumblrRedditEmail

listening, watching, playing

by Kaylah Stroup August 27, 2015

Back in February I did a little post called “listening, playing, watching” where I just shared a little about the things I was up to. In a reader survey at the very beginning of the year a few people expressed interest in a series of posts similar to my “what I’ve been reading” posts except with television, movies, and video games. I was really happy with how that post turned out. It’s not something I can do super often though because I’m a creature of habit and I’ll usually be watching, and listening to the same thing for months at a time. It finally feels like it’s been long enough to do another edition.

Listening
Not too long ago I discovered The Front Bottoms and according to last.fm I’ve listened to their songs 1,279 times in the last three months. I’m not sure if that fact packs enough of a punch until you see that my second most played band, Why?, has only been played 631 times in the last three months (which is still a lot!) Yeah, so needless to say, I’m super into them. I wish I could recommend just one song but I love everything. Give them a listen for sure!

Also, Spotify recently added a feature where they make you a little playlist of music they think you might like at the beginning of each week and I’m a little embarrassed to say I look forward to getting my new playlist every Monday. It’s ridiculously accurate. I’ve discovered lots of new artists and songs I enjoy. Nothing that will become my new favorite but it’s super helpful as someone who does get stuck in patterns of listening to things. It’s fun to hear things that I actually enjoy and don’t have to search hard for.

Watching
I’ve been on a movie kick lately. I have HBO GO on my apple tv and I think I’ve basically watched every movie on it. Sewing does that to me. If I’m sitting in front of my sewing machine, I am watching a movie. A few that I’ve enjoyed recently for the first time : Feardotcom, Don’t Tell Mom The Babysitter is Dead, Gone Girl, Hell Baby, Inspector Gadget,  My Favorite Martian, Neighbors, and The Other Woman. Inspector Gadget, and My Favorite Martian are both things I feel like should have been part of my childhood but some how I missed them (or just don’t remember them at all) but they immediately feel like the kind of movie I’ll want to watch when I’m feeling under the weather. Please say you have a list of movies you like to watch when you’re sick too! My list include basically all Jim Carrey movies, Beetlejuice, and Jumanji.

As for TV shows Jeff and I are in the middle of watching Wayward Pines which is way weird. He’s read the books, which is why we started watching, but I’m still totally out of the loop with whats happening. I’m definitely enjoying it though.

Oh! Oh! Oh! And even though it was a little while back it’s worth mentioning that if you’re looking for a documentary on Netflix I recommend An Honest Liar. We actually turned it on because the movie we had just started was making a funny sound and we wanted to see if it was the movie or the tv itself. We switched An Honest Liar on and some how immediately got sucked in. I literally don’t think I’ve ever loved a documentary so much!

Playing
Adventure Time Puzzle Quest. Downloading this game was the biggest mistake… in the world. You’re battling characters while working your way through a map. Each one of your moves hurts the opponent a certain amount. You can use treasures you find to level up your characters. The reviews on the game are kind of mixed since it does have some glitches. Regardless, it’s way more fun than I was expecting! I downloaded it late one night while in bed because I couldn’t sleep and now I’m playing like every second I can. Sorry in advance if you download it and waste a ton of time.

I’m actually still playing Hyrule Warriors. I got it for Christmas last year, and somehow I’m still finding new quests to do? I purchased the expansion pack a few months back which was twenty bucks and it added about one billion more hours of game play. I feel like I’m kind of stuck now though. I need to level up characters I don’t care about before being able to beat levels that will unlock other levels but I still play regularly. I can’t say enough good things about this game. I wish all video games had this much content!

Aaaaand that’s that! What have you been listening to, watching or playing that’s worth talking about? I’m always looking for suggestions.
xoxo

0 FacebookTwitterPinterestTumblrRedditEmail

Desert Dreamin’ at Joshua Tree

by Kaylah Stroup August 26, 2015

I’m finally at the end of my photos from mine and Jeff’s big adventure at the beginning of June. I feel like I’ve just been holding on to these photos to make it feel like I wasn’t finally done. Writing these posts and looking back through the photos have been a great help in soothing my ache to travel. I’ve been having dreams these last few weeks where we’re out in the desert again. I literally get teary eyed even trying to explain how much I love the desert. Being in a car in the middle of my desert with just Jeff, and all our camera gear is when I’m happiest.

Back to the subject at hand, our last big stop of the trip – Joshua Tree! We were on our back to Phoenix after spending the night at Wigwam Village when we just so happened to pass a sign for Joshua Tree National Park. It wasn’t something that was even on our mind and we were more than ready to get to our final hotel of the trip but we figured at the very least we could get some more stamps in our national park passport book. We picked up a park map, and chose a spot to get out and play so we could say we spent a little bit of time there. The very first thing I spotted on the map was the Cholla Cactus Garden – that without a doubt was what I really wanted to see.

It’s just a quick walk through the garden but it was an excellent one none-the-less. We took photos, admired tiny birds nests in the cactus, and took silly panoramic iPhone photos where it looked like Jeff was floating.

Last year while we were at Noah’s Art I was walking backward taking photos and not paying attention when I got one of these cactus stuck my ankle. I called Jeff over and had him pry it off with a stick. I almost immediately regretted not stopping to photograph it before removing it but I was left with a little reminder anyway – it actually bruised! It was sore for the whole rest of the trip too. Since that was my only previous experience with cholla cactus I did my best to be oh so careful in this garden full of them.

Guess its time to plan another trip now, right?
xoxo

You can find more posts from our road trip under the “travel” tag. 

0 FacebookTwitterPinterestTumblrRedditEmail

Trans-Allegheny Lunatic Asylum

by Kaylah Stroup August 24, 2015

I spent my twenty fifth birthday in a mental hospital – one that was abandoned, purchased at auction, partially restored, and now offers tours! I’m talking about the Trans-Allegheny Lunatic Asylum. It’s a little over two hours away from Oglebay, where we stayed the night, so it was kind of must. We woke up fairly early, ate the best hotel breakfast I’ve ever had, and made our way there. Although I’m not a huge fan of guided tours (okay, I kind of hate them) and that’s all they offer – we had to see this place!

Trans-Allegheny Lunatic Asylum was in operation from 1864 until 1994. It was originally built to house only 250 patients but in the 1950’s peaked at 2,600 patients. Like the majority mental hospitals that were open at the time, there are many stories of wrong doing. An investigation in 1949 found unruly patients locked in cages, lobotomies being performed with ice picks, and conditions so poor they were surely the cause of death in many patients.

This building has suffered it’s fair share of abuse as well. In 1935 a patient started a fire in his closet that destroyed six male wards and caused one of the cupolas to fall through the roof. It sat abandoned from the time it closed, in 1994, until 2007 when it was bought at auction for 1.5 million dollars. Of course, much like any abandoned building, many explorers found their way in to photograph this gorgeous building, and in 1999 vandals did quite a number on the interior…but it’s probably not what you’re thinking. All four floors of the building were damaged by police officers playing paintball!

The building’s condition had deteriorated to the point where it’s survival was threatened. A dedicated team of staff and volunteers are now committed to restoring it to it’s former grandeur. Our guide pointed out a few things in the main lobby that they had restored and it’s apparent how much time and love they’re putting into this place. One of the other people on our tour asked “Are you ever going
to fully restore it? Or just leave it looking abandoned?” I don’t recall exactly what she said but I caught something about how they would probably leave some sections fixed up just enough to be safe because photographers would otherwise be outraged. Jeff and I shot each other knowing looks. Heaven knows I love me some peeling paint!

One of my favorite things I saw were actually the stone faces on the exterior of one of the buildings. It is said that spirits cannot come in through the front door so they put these ugly faces above the back door to scare away any spirits who might wander in the back. The uglier the better. While I don’t believe in “spirits”, I do LOVE folklore. After walking back in the building Jeff whispered “Can we get some of those for our house?” I had already been thinking of asking him the same thing!

After the tour you’re allowed to visit a wing of the main building that’s basically a museum. There are tools, old photos, headstones, and even some of the former patients artwork. It was a great way to end the tour, especially since I wanted more. We took the shortest tour since I hate guided tours so much (and of course, time constraints) but I was way into it! I feel like they could probably rope people into the longer tour at the end of the short tours by simply offering to let them pay the difference and continue on with the group.

Like I mentioned, I am not a fan of guided tours but this one was well worth it. Our tour guide was knowledgeable, kind, and seemed to actually be interested in what she was doing. Maybe I’ve only been on guided tours with poor guides in the past? We only took the first floor tour but I would love to go back to take the cemetery tour. It’s not my thing, but if you’re into ghost tours they offer those year round as well. I definitely recommend stopping in if you’re anywhere in the area! It was waaaay cool to be able to finally visit such an incredible building with such amazing history.
xoxo

0 FacebookTwitterPinterestTumblrRedditEmail

Wigwam Village #7

by Kaylah Stroup August 13, 2015

One of my greatest joys in life is crossing off goals. That sounds weird, but stay with me here, I just find such great pleasure in making goals and accomplishing them. It doesn’t matter how silly the goal it is or how insignificant it may seem to someone else, I just love accomplishing things. Some days on my to-do list along with work related things I’ll write “shower”, “make bed”, etc just because I love crossing things off.

Since the second I learned about Wigwam Village a few years back I knew I needed to stay there. I love tacky roadside attractions, and tourist traps. It’s just so kitsch, how could you not love it!? For the longest time I couldn’t find anyone to go with. The only one I knew of at the time was in seven hours away in Kentucky. No one saw the point except me.

Fast forward a few years to June of 2014, Jeff and I are getting ready to head out west on our first big road trip together. While looking up things in the area I realized there was another Wigwam Village in Holbrook, Arizona. We stayed, and it was just awesome as I had made it out to be in my mind. It was in no way luxurious but it was awesome!

When I got home I did a bunch of research on the history of Wigwam Village. Originally built in the 1930s + 40s, there were seven Wigwam Village locations. Now only three remain, each of which has been added to the National Register of Historic Places. Holbrook, Arizona, Cave City, Kentucky, and San Bernardino, California. I had to visit the other two!

A few months later, for our six month anniversary Jeff and I took a trip down to Cave City and stayed at that Wigwam Village.  Then in June, while on our most recent road trip, we finally crossed number three off the list, San Bernardino – number seven of the original seven! I say finally but we managed to stay at all three of the remaining Wigwam Villages in a span of just a few days over a year which is pretty darn awesome, right?!

Of the three Wigwam Villages I think this one was the nicest inside. It might have even been bit bigger than the others as well. That’s not to put the others down though, all three were clean, had friendly staff, and made for super cool photo opportunities.

I celebrated crossing off my goal of staying at the three remaining Wigwam Villages by getting a permanent souvenir. While shoving my face with a delicious burger from In-N-Out I searched for tattoo artists in the area. I wasn’t able to find one in San Bernardino on such short notice but found Mikey Sarratt at High Noon Tattoo in Phoenix. He not only responded to my email super quickly, but came in on his day off just to do this little tattoo. I was SO nervous but I seriously could not be happier with the finished result!
xoxo


Special thanks to Jeff for being more than willing to make all my silly little dreams come true. That guy hates staying anywhere but really nice hotels but made the exception because he understood how much it meant to me. You da best! I love you!

Save

0 FacebookTwitterPinterestTumblrRedditEmail
Newer Posts
Older Posts

About Me

About Me

Hello!

I'm Kaylah! Renovating a 150-year-old home in Northeast Ohio. Likely found in my garden.

Categories

  • all the posts!
  • animals + nature
  • beauty, fashion + hair
  • explore everywhere
    • abandoned
    • cemeteries
  • plants + gardening
  • reviews
    • books
  • some of my favorite posts
  • stroup mansion
  • window shopping

disclosure

click to drop down
The Dainty Squid is a for profit blog. and we participate in a number of affiliate programs meaning, at no additional cost to you, I will earn a commission if you choose to make a purchase through one of those links. For more details click here

psssst! while you're here, check out my stained glass. Dainty Squid stained glass

copyright 2026 the dainty squid / kaylah stroup. please contact me about photo usage.


Back To Top
THE DAINTY SQUID
  • blog
    • all the posts!
    • stroup mansion
    • some of my favorite posts
    • plants + gardening
    • beauty, fashion + hair
    • reviews
    • window shopping
    • explore everywhere
  • about me
  • contact
  • shop