THE DAINTY SQUID
  • blog
    • all the posts!
    • stroup mansion
    • some of my favorite posts
    • plants + gardening
    • beauty, fashion + hair
    • reviews
    • window shopping
    • explore everywhere
  • about me
  • contact
  • shop
Tag:

Archive

Nail Tutorial // Zig Zags!

by Kaylah Stroup February 9, 2012

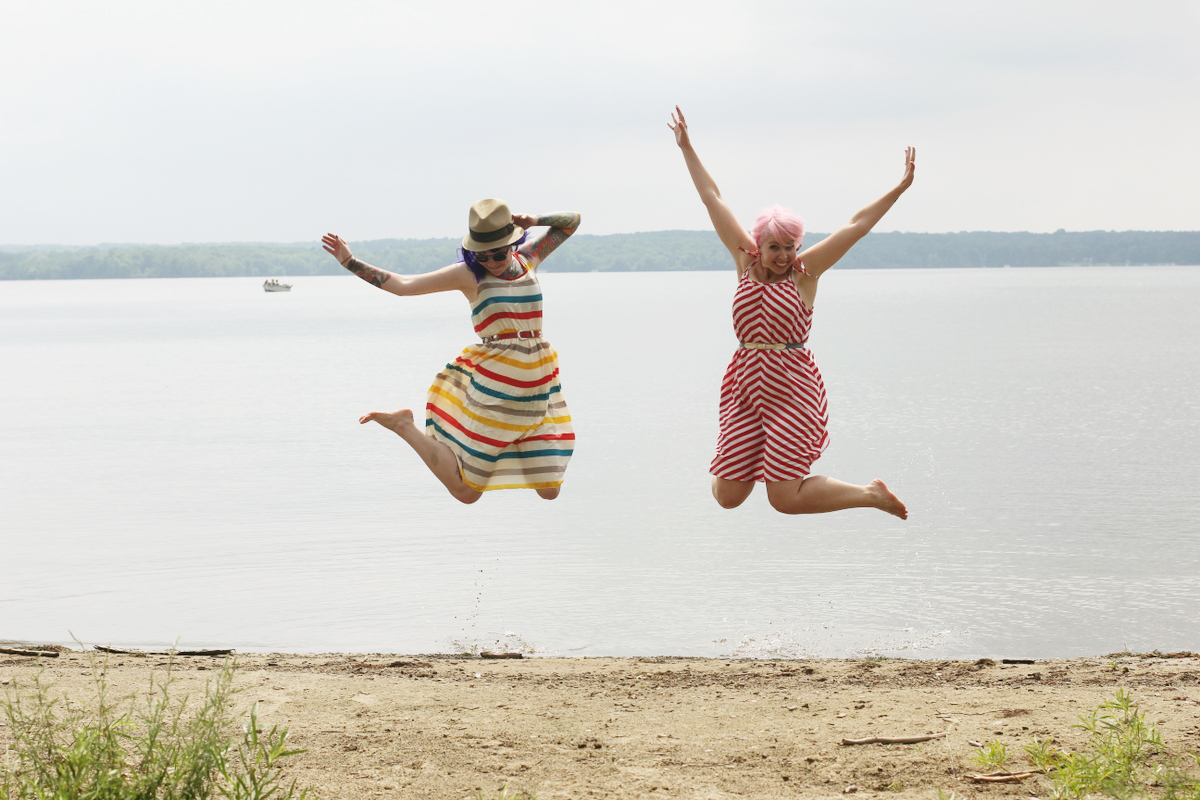
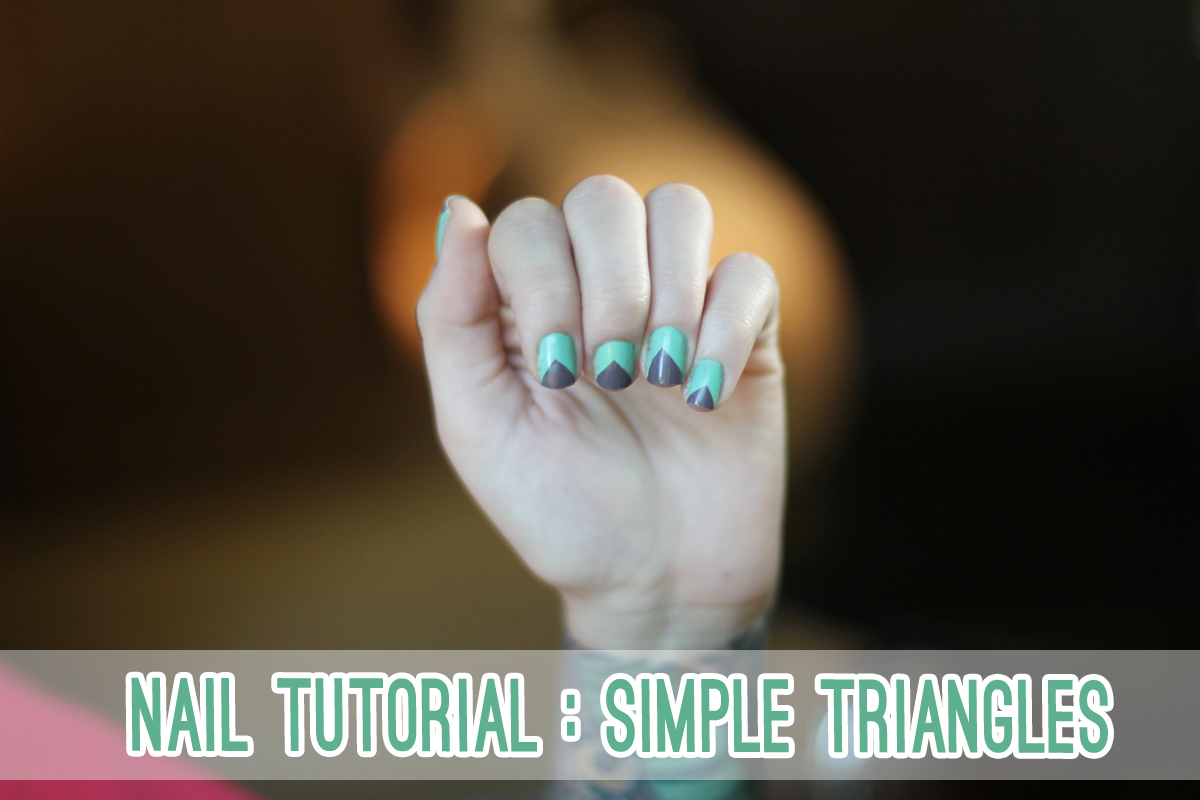
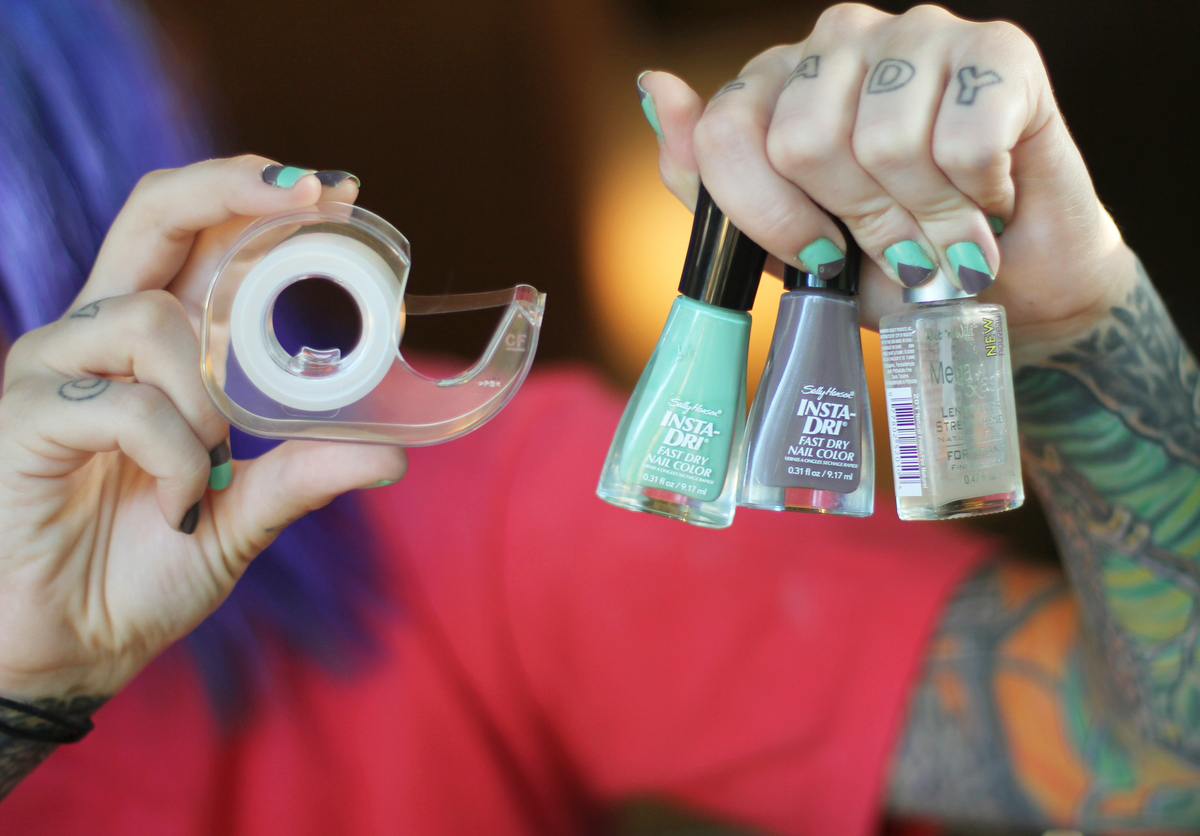
During mine and Elycia‘s blog weekend we worked on a cute little nail tutorial. While it does take some patience (drying time) it’s super easy and perfect to do while you watch a movie in the evening. Let’s get started…

♥ three different nail polish colors ♥ tape ♥ pinking sheers

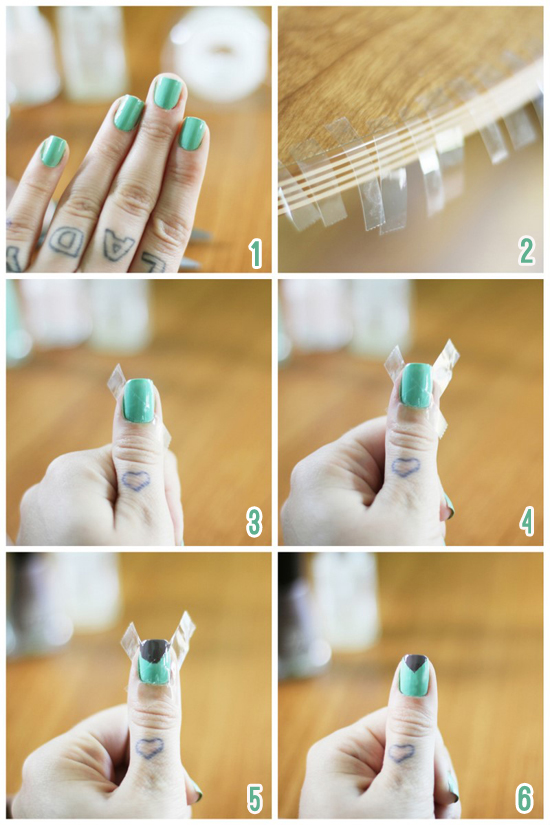
1 // Use your pinking sheers to cut out ten strips of tape. You’re going to want the tape to have been cut on both sides so it has zig zags. *Tip* press the piece of tape to your (clean) hand before you cut and apply it to your nail so it’s easier to use and not so sticky!

2 // Paint your nails one solid color, and let dry completely.

3 // When your nails are 110% dry apply the small piece of tape across your nail in the middle so that there are equal areas not covered on the top and the bottom.

4 // Using which ever color you’d like next paint the bottom portion of your nail. It’s easiest to start from the bottom of your nail and paint slowly and steadily up to the tape.

5 // Now paint the top part of your nail starting from the top of the tape to the tip of your nail.

6 // As soon as you get done painting take the tape off quickly in one solid pull. If you do it slowly it might pull up some of your newly painted polishes. Now repeat with the rest of your fingers and after that’s all dry seal it up with a top coat. My favorite is seche vite!

green and blue combos by me, black & white and purple combo by Elycia.

Let us know if you have any questions and send us pictures if you use the tutorial, we love to see your color combos! I know I have about a million more I want to try! 😉
xoxo

0 FacebookTwitterPinterestTumblrRedditEmail

2012 Bulletin Board!

by Kaylah Stroup January 4, 2012

I’ve always loved taking everything off my bulletin board and putting new things up. A new year seemed like a great excuse to do it again, so that’s what I did. I left a few of the same things up, I just couldn’t bear to part with them but I did add lots of new things.

Here are a handful of detail shots, since they are always my favorite.

It’s kind of all over the place, but it’s perfectly fitting for me. There are cutesy things (the cat card with the fuzzy tail and bunting), nature things (dried mushrooms and animal photographs) and random things that I love (pictures of my nieces and nephew, neat keys, and stamps.) Everything on it makes me happy, I love looking at it!

Do you have a bulletin board or inspiration board? What do you put on it?
xoxo

0 FacebookTwitterPinterestTumblrRedditEmail

This year I…

by Kaylah Stroup December 31, 2011

found a new favorite hobby – pressing flowers…

did lots of exploring and appreciating of nature…

made lots of new animal pals…

met a great new friend who I can hopefully continue to grow closer to in 2012…
found a new favorite camera…
got braces and watched my teeth rapidly change…
was honored to be one of modcloth’s bloggers of the moment…
made lots of pretty things for The Dainty Squid shop and even started up a new business, Circus Bear Vintage,  selling vintage…
just like last year, dyed my hair lots of pretty colors…
found and identified lots of mushrooms…

2011 was a great year! I can’t wait to see what 2012 brings! I hope you guys have a wonderful (and safe!!) New Years Eve!
xoxo

0 FacebookTwitterPinterestTumblrRedditEmail

DIY shoe fringe

by Kaylah Stroup December 21, 2011

I’m a total sucker for shoes with fringe, even the ugliest of shoes is somehow charming to me with fringe. So I decided to give it a go and try and make fringe that I could add to make all my already awesome shoes just a little bit better!

Supplies needed: ♥ pinking shears ♥ scissors ♥ hold punch ♥ vinyl (or leather) ♥ a pair shoes
Use the photo below to make sure you have the right kind of shoes as some kinds are not suitable to add this fringe too.

The flaps (for lack of a better word, I’m no shoe expert!) that the laces tie into need to be not connected. In the first picture you can see where the flaps are attached at the bottom to the shoe, in photo number two you’ll see that they are not connected. Basically you just need to be able to insert something from the bottom of that area for them to be the correct kind of shoe for this tutorial.

Got the right shoes now? Here’s how to add some fancy removable fringe!

1 // Unlace your shoes and measure how wide the area is at the bottom of your lace flaps and how long the tongue is, add 1 inch or so to the length for fringe then cut out a piece of vinyl using those measurements.
2 // After it’s cut make sure the piece fits and trim, if necessary.
3 // Using your pinking shears cut just enough off that you’re able to get the pretty little zig-zag design. After that’s done, using regular scissors, cut one inch up each one of the peaks made by the pinking shears.
4 // Insert the vinyl piece back in the shoe and use a marker to mark your bottom holes. Make sure to make both of the shoes the same!
5 // Punch holes where you marked in the previous step.
6 // Put your shoe lace through the vinyl piece as shown in the photo, with the laces coming out the front.
7 // Lace up your fancy new shoes and enjoy!!

grey shoes pre-fringe c/o Blowfish & heart tights from ebay.

Some tips and ideas!

♥ Try different lengths for a different look! A shorter fringe would be less eye catching and more like secret pizazz!
♥ Use a contrasting color fringe to add a bold pop to your shoe! 
♥ Make multiple fringes in different colors to make black shoes coordinate with any outfit! This fringe only takes a few minutes to make.

Let me know if make some removable fringe for your shoes, I’d love to see a photo!
xoxo

0 FacebookTwitterPinterestTumblrRedditEmail

What I wore; Party Time!

by Kaylah Stroup November 21, 2011
the details:
coat – forever 21 (from at least 5 years ago!)
skirt and shirt set – estate sale (FIFTY CENTS!)
belt – modcloth
sweater –thrifted
tooth pin – Rachel O’s on etsy
acorn pin – c/o Sugar Cookie
tights – We Love Colors

shoes – Soho c/o Wanted Shoes

This is what I wore to my grandpa’s 80th birthday surprise party last weekend.  I tried to pick out something at least moderately conservative (read: tattoos covered) Some days you just don’t feel like talking about them, especially with all your great aunts who don’t have filters from their brains to their mouths. The party was great, my grandpa was totally surprised and had a blast! He can’t stop talking about it!
Before the party I had a few hours to waste, so we headed to the cemetery. I figured there would be somewhere in there pretty to take outfit photos. Plus it was a beautiful day and I love exploring cemeteries! I love looking at all the old headstones, calculating how old they were, and imagining what they were like. Lets not forget what awesome names everyone had, so strong and powerful – I’m pretty jealous! I took a bunch of photos but afterwards realized I’d be much happier if the photos were film, not digital! I guess that just means we’ll have to go back again!
Hope you’re having a great Monday! I’ve got a busy one. Thanksgiving is sneaking up and I have so much to do before taking a little holiday break. (Don’t worry, I’ll still be blogging daily!)
xoxo
0 FacebookTwitterPinterestTumblrRedditEmail

Estate Sales 101

by Kaylah Stroup November 9, 2011
Each time I mention an estate sale I get more than a few questions about them so I figured it would be a good idea to make a post about them and hopefully inspire a few people to go to one!

What’s an estate sale? An estate sale is like a really big garage sale, basically. Estate sales usually occur when someone dies or moves to somewhere where they will be unable to keep their things (like a nursing home) and their closest of kin are unable or unwilling to keep their possessions and need to sell them quickly.

What can I expect from an estate sale? In most cases estate sales are located in the former owners home and you’ll be able to enter the house and shop, just like it was a store.

Some sales are conducted by companies and some are organized by the family. Either way, if it’s an estate sale and not an auction all of the items will be priced. Sometimes it might be categorized (ex. there might be signs around the house : clothes $2/piece, purses $.50, shoes $2/pr) and other times each item might be individually priced.

There is a common misconception that estate sales are only for the wealthy, this is most definitely not the case. You can find lots of steals (like 50 cent vintage dresses or a $20 couch) at these sales. You shouldn’t judge a book by it’s cover but try to keep in mind if you’re in a wealthier neighborhood chances are you’re going to be paying more and finding bigger ticket items. We live in a smaller town and tend to find estate sales where the homes full of small items at great prices. Don’t be afraid to stop in to a sale even if you think the outside of the home looks a little too rich for your tastes – you never know what’s inside!

What can I buy at an estate sale? Let me reword that for you…what can’t I buy at an estate sale? Like I mentioned in the previous question an estate sale normally encompasses everything in the house. You can find just about anything at a sale. Think about your own home, take out the food – everything else? it’s probably for sale! (Actually I’ve been to an estate sale where there was food for sale too!)

Where do I find out about estate sales? My top four ways to find out about estate sales are:
• The newspaper.
• estatesales.net. This website is a very valuable resource of mine. On the front page there is a map where you choose your state and then the city closest to you. From there it will show you all the estate sales going on in the upcoming weekend. It’s best to check often because a lot of the time there isn’t much warning. Their mailing list is a life saver! You give them your email address and zip code and they’ll shoot you an email when a sale is coming up in your area.
• iPhone apps! My two favorite apps for finding estate sales are Garage Sale Rover (free!) and iGarageSale ($1.99). Garage Sale Rover is particularly useful as it indicates estate sales with blue markers as opposed to the red ones garage sales are marked with.

• Craigslist! Try searching “estate sale” in the for sale section of the search.


A few tips!

• Unless you’re going to buy something that you saw listed in the ad, try going on the last day of the sale. At estate sales the point is to get rid of all these things so on the last day there will usually be a big sale. 50% off is common but I’ve seen up to 90% off!!

• Be courteous. When the sale is put on by the family members a lot of the time they’ll be the one who is at the check out or watching over the rooms to make sure people aren’t stealing, remember that they most likely just lost someone. There have even been instances where we’ve walked into rooms where things were for sale and found someone grieving. It’s best to smile politely and walk out of the room  in that case. 

• Take your time exploring the house. Go in every room that you’re allowed to (if you’re not allowed to enter a room it will be marked “private” and be closed off), check closets and make sure not to forget the basement and sometimes even the attic.  Even if you don’t find anything to buy it really is an amazing opportunity to visit a home. There was one beautiful mid century time capsule of a home we went to an estate sale at that I literally teared up because it was so gorgeous (seriously, it was my dream home!) It’s an amazing experience to be honest. 

• Always bring cash! I’ve never been to an estate sale where they accept credit cards but some do take checks. 

• Unless it says “not for sale” don’t be afraid to ask about purchasing something! Love the curtains? the stove? that rug? Ask how much they’d be willing to sell it for!

I hope this helps! If anyone else has any more questions about estate sales feel free to ask! 
Have fun! 😉
xoxo

0 FacebookTwitterPinterestTumblrRedditEmail

Nail Tutorial: Strawberry Nails

by Kaylah Stroup September 26, 2011
I have another cute tutorial to share today (see the last one here, it’s on how to make a triangle design). I’m going to show you how to make your finger nails into cute little strawberries. Sure there has been a million other tutorials on strawberry nails but the problem I found was that I can’t freehand with polish. But then it hit me…I could use tape!

 • pinking sheers • red nail polish • green nail polish 
• a nail art pen (or black nail polish and a toothpick) • top coat • scotch tape

Now that you’ve gathered your supplies, let’s get started!

1 // Paint your nails red!
2 // After the base coat is dry cut ten strips of tape using your pinking sheers. Firmly apply one piece per nail.
3 // Apply the green polish on the area you left un-taped for the leaves.
4 // Gently, and slowly pull of the tape. I find my nails turn out best if I take the tape off immediately after painting instead of waiting until my whole hand is done.
5 // Using your nail art pen or a tooth pick and black nail polish randomly place polka dots on your nails
6 // After everything is dry, add a top coat! My current favorite is Essie Good to Go, it dries so so so fast!

7 // Enjoy!!!

It’s very easy, just make sure to have patience and take your time.
Make sure to leave me a link if you decide to try on your nails! 😉
xoxo

0 FacebookTwitterPinterestTumblrRedditEmail

Nail Tutorial: Simple Triangles!

by Kaylah Stroup July 28, 2011

I have a simple, but really cute nail tutorial for you today! I just figured it out the other day and have been completely obsessed ever since. I’ve got so many color combos swirling around in my head!

You will need // Two colors of nail polish, plus a top coat, scissors and scotch tape.
Step 1 // Paint your nails one solid color and let dry completely. It is extremely important that they aren’t even remotely tacky.
Step 2 // Rip off ten pieces of scotch tape (one for each nail) and then cut those in half so you have twenty total strips.
Step 3 // Apply one strip of tape crossways, make sure to press down firm.
Step 4 // Apply a second strip of tape across the opposite way.
Step 5 // Paint the tip of your nail, which shouldn’t be taped, in the other color.
Step 6 // Peel off tape & wait for it all to dry!

Some tips:
• Don’t try to use packing tape, it won’t work and you’ll just end up getting mad (experience taught me this one!)
• It is a necessity to wait for each coat to dry before adding another, or applying tape!
• Peel tape off ASAP,  the quicker the better because even if your base coat is completely dry it still might peel if you leave the tape on too long.
• Adding a top coat will blend the two layers so there isn’t a step up to the triangle.
• If you’d like to do the triangle in lighter color than the base coat then try adding a coat of white to the triangle area first.

Have fun! Leave a link in the comments in you decide to blog about your pretty nails after trying the tutorial, I’d love to see!!
xoxo!

0 FacebookTwitterPinterestTumblrRedditEmail

Book Recommendation: Q & A a day

by Kaylah Stroup July 9, 2011
I have a fun little book recommendation for you today! I found it not too long ago and had to have it!

The book says “365 questions, 5 years, 1,825 answers”. It’s like a mini journal. Each day it has a question for you to answer. They’re just simple questions, things you can answer with a just a sentence or less. Here a few examples;

  • “When was the last time you worked out?”
  • “What did you have for dinner?”
  • “Waking up was _____”
  • “If you had to move to a new city, where would you move?”
  • “What motivated you today?”

And after you’ve completed a year, you start again with the same questions (the book has five rows of “20__” for your to fill in the year) to see how your answers change! 

You can start any time in the year and in any year since you fill in the years yourself! I can’t wait to see my answers change over the years. I’ve always loved filling out questionnaires and things like that so this is just up my alley!

Is anyone else doing this book or any of the similar ones? I saw a few different kinds, including this one but I felt like the Q and A a Day would be easiest for me to maintain for such a long time.
xoxo

0 FacebookTwitterPinterestTumblrRedditEmail
Newer Posts
Older Posts

About Me

About Me

Hello!

I'm Kaylah! Renovating a 150-year-old home in Northeast Ohio. Likely found in my garden.

Categories

  • all the posts!
  • animals + nature
  • beauty, fashion + hair
  • explore everywhere
    • abandoned
    • cemeteries
  • plants + gardening
  • reviews
    • books
  • some of my favorite posts
  • stroup mansion
  • window shopping

disclosure

click to drop down
The Dainty Squid is a for profit blog. and we participate in a number of affiliate programs meaning, at no additional cost to you, I will earn a commission if you choose to make a purchase through one of those links. For more details click here

psssst! while you're here, check out my stained glass. Dainty Squid stained glass

copyright 2026 the dainty squid / kaylah stroup. please contact me about photo usage.


Back To Top
THE DAINTY SQUID
  • blog
    • all the posts!
    • stroup mansion
    • some of my favorite posts
    • plants + gardening
    • beauty, fashion + hair
    • reviews
    • window shopping
    • explore everywhere
  • about me
  • contact
  • shop